Monday, December 12, 2022

How to DIY Universal TRS MIDI Adapter

 MIDI is great. It's been around forever and lets all of our synths communicate with a simple protocol across a sturdy and robust 5-pin DIN connector. Unfortunately, as devices have gotten smaller and space on those devices becomes ever more valuable, many manufacturers have ditched the venerable 5-pin DIN connectors for the smaller (and cheaper) MIDI-over-TRS (TRS stands for Tip/Ring/Sleeve; it's known informally as 3.5mm stereo or "aux" cable). When I first learned of this shift, I didn't think much about it. My device came with a TRS-to-female-DIN adapter and that was that.

Until I got a second TRS-MIDI device and none of my dongles worked with it.

I'm not sure on the history of how this came to be, but there are actually two competing and physically incompatible MIDI-over-TRS standards, known as "type A" and "type B". Some manufacturers tend to use type A connections while others use type B. As far as I've seen, this information--that is, which standard any given device uses--is never printed beside the ports on the device, and it's very rarely on the adapter dongles (I've only ever seen it labeled on third-party adapters, never first-party).

Both standards use the same pins from a 5-pin DIN--the 2, 4 and 5 pins, to be exact--and both use pin 2 (the one at the bottom/middle) as the ground pin:

The only difference between the two standards is whether pin 4 is Rx and pin 5 is Tx or vice versa. Infuriatingly similar.

After buying and selling some synths, I've ended up with all of my devices using the same standard (I can never remember which) and not enough of the right kind of adapter to cover both input and output on all of them. I considered cutting up some of my adapters from the other standard to swap the polarity (i.e., to convert them to the standard my current gear uses), but I didn't want to keep dealing with this problem in the future, so I decided instead to use a DPDT switch I had lying around to make a universal, switchable TRS-MIDI Type A+B cable.

The first step in this process was to cut open my extra TRS-MIDI cable. You could also accomplish this by cutting up a cheap MIDI splitter cable and a spare TRS/3.5mm/aux cable, which would let you make two universal cables at the same time (to cover both your MIDI in and MIDI out). My cable has a green wire, a white wire and a shield around them, which connects to the ground pin.

So, the way a simple 2-way DPDT switch works is you have 2 pins in the middle and when the switch is turned one way, they bridge to the 2 pins on one side and when you flip the switch the other way, they bridge to the other pins, like so:

Now, looking at the underside of our DPDT switch:

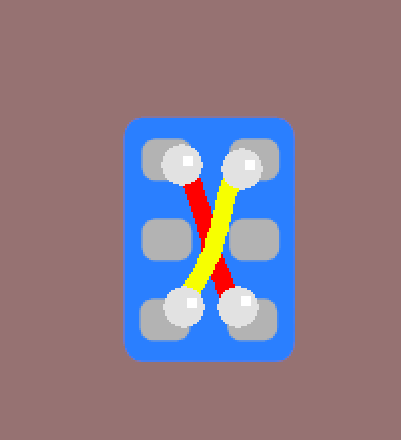
we need to do a criss-cross bridge with some tiny jumper wires to connect our outside pins from one side of the switch with the opposite pins on the other side of the switch, like this:

Next, we solder one side of our cable's wires to the outside legs on one side of the switch, like this (it doesn't matter whether you do the TRS side or the DIN side of the cable; either works):

After that, we take the other side of our cable--whichever one you didn't use in the previous step--and solder its wires to the two inside pins, like this:

Once that's done, the last step is to connect your ground lines together. They're not involved in the switching process at all, so just link 'em up:

That's it. You're done.

I don't know why this problem even exists, and I don't know why nobody makes/sells switchable cables like this, but thankfully, we can deal with it ourselves with little fuss/investment.

Friday, June 11, 2021

MT32-Pi (or MiniDexed) - The best cheap synth value around

Like pretty much everyone else, I decided to get into synths during the COVID lockdown period, but seeing as I'm a cheap bastard, I wasn't too excited about dropping $300+ on each piece of gear and started looking for cheaper ways to explore the hobby. I figured there was sure to be some mostly turnkey, DIY solution based on an Arduino or Raspberry Pi that would give me a quick, low-latency, headless and flexible (and good sounding!) MIDI-controllable synthesizer that I could just flash onto an SD card and be off to the races.

It turns out that this is much more difficult to find than one would expect.

Almost everything I could find is limited and/or poor-quality (everything Arduino-based) or unusably latent and/or extremely difficult to use and set up (everything RPi-based with JACK). RPis also have pretty crummy audio quality from their built-in 3.5mm headphone jack, but that's a minor gripe vs getting it to work at all.

However, I had the astonishing stroke of luck to come across a wonderful, free, open-source project that was just maturing to the point of usability when I was looking, and it checks all of my 'required' boxes and more: mt32-pi.

EDIT (5/30/2022): For the past few months, I've been using another excellent and new (at the time of this writing) software called MiniDexed, which also fills this same niche, but is based on the legendary Yamaha DX7 FM synth. Check it out!

This project describes itself as "a baremetal kernel that turns your Raspberry Pi 3 or later into a Roland MT-32 emulator and SoundFont synthesizer based on Circle, Munt and FluidSynth." For those who aren't familiar with the MT-32, it was a sound generator for MIDI keyboards back in the '80s-'90s but also found success as an ultra-high-end solution for video game audio in the days before CD-ROM soundtracks took over. For a taste of how much better the MT-32 sounded than competing sound solutions, check out this video.

So, just using the built-in MT-32 instruments, you can get some really great, authentic retro sounds, from synth bass to horns to percussion. Mt32-pi also supports SoundFonts, though, through its FluidSynth mode, which really opens up your possibilities to basically anything you could ever want. And, since it runs baremetal, there's no OS running in the background, no ALSA adding latency, no hassle of setting up a JACK server and wondering why your sound doesn't work, etc. It boots up in just a few seconds (it takes about the same amount of time as my pedalboard) and responds with live-performance-friendly low latency.

It seems most of the buzz surrounding this project comes from its usefulness as an outboard sound processor for the (fantastic) MiSTer FPGA retrogaming platform, which doesn't have the resources to do good MT-32 emulation on its own while also emulating the original PC 486 hardware needed to the play the games in the first place. For this reason, if you just go searching around, you'll likely find that most of the information and accessories (there are a number of places selling cases and hats, etc.) are catering specifically to this purpose/market rather than music/performance, but the mt32-pi project's wiki includes plenty of information to track down or build your own, should you feel the need. (as an aside, the mt32-pi developer, d0pefish, didn't even realize there was a demand for the retrogaming aspects of the project, as he created it purely for music/performance purposes, just as it was with the original MT-32)

In my case, I felt the bare minimum was a cheap OLED display (SH1106 and SSD1306 models are both great, simple and compatible options available for $2-$8 on eBay/Amazon/AliExpress) and a couple of arcade buttons to control the mode (MT-32 vs FluidSynth) and to cycle through the available SoundFonts (loadable from a hot-swappable USB drive). I also use an I2S DAC for better sound quality (again, $2-$8 from eBay/Amazon/AliExpress), but you can get by with the built-in if you don't mind occasional crackling in quiet parts. All of this is connected directly to the RPi's GPIO pins via dupont connectors.

I also found the gain to be a bit too low vs my other equipment, so I pair it with a cheap headphone amplifier I built to give it a little more grunt (the popular KKmoon kit is good for this, but I went for the 47 HIFI NE5532 kit instead, as it has more robust thru-hole soldered I/O jacks, which will stand up to repeat plugging/unplugging better than the KKmoon's fragile surface-soldered pads). You can't really see it in the pic as it sits directly underneath the RPi and is almost exactly the same dimensions.

Many of the available hats include full-size MIDI DIN connectors, but you can also use any standard USB-MIDI interface/breakout. In fact, I control mine through an Arturia KeyStep (which is an incredible value in its own right) plugged directly into the RPi's USB ports. That is, both devices are connected via USB-MIDI, with USB on both ends; no actual MIDI ports involved, which leaves those ports free on my KeyStep to control other things, like my Roland TR-08 drum machine. I do get some occasional weird behavior (some stuck/dropped notes) with this setup, though, which I think is caused by the KeyStep pulling too much voltage.


So, between the KeyStep and the RPi plus accessories, my full kit costs somewhere between $150 and $200, with the vast majority of it coming from the KeyStep. This is in-line with Korg's Volca line of products (which are great!), but with more power/flexibility in some ways (the KeyStep has an amazing arpeggiator and powerful sequencer and it can serve as the timing heart of your entire setup, while the Volcas' sequencers are simplistic and lack arps entirely) though admittedly less in others (i.e., no knobs to sculpt your sound on the fly; however, the staggering number of SoundFonts available means the Volca FM's compatibility with DX7 patches makes it the only cheap synth with comparable breadth of sonic possibilities). If you already have a MIDI-capable keyboard/controller lying around, you can get the whole thing going for sub-$50, which is simply impossible to beat, value-wise, and if you're already an RPi enthusiast, you may have everything lying around on your workbench already.

Sunday, December 6, 2020

Improving shuffle/random playback - Plex

Whenever people discuss random playback of multimedia files online, I always see this same anecdote pop up: Apple wanted to add shuffle to iTunes, so an engineer made a perfectly random algorithm to serve up perfectly random tunes. Some time passes and users start to complain because the algorithm seems to have an affinity for certain songs that are played over and over while others languish, played only infrequently or even never. As the story goes, the algorithm is, of course, perfect, and the silly humans merely perceive patterns where none exist, like superstitious cavemen, and the ratio of plays would have tended toward 1.0 if they had just waited long enough and with a large enough sample size. So, our fabled engineer goes back to his perfectly random algorithm and makes it less random, but in a way that appeases the poor dumb-dumbs, and that's how we get iTunes' shuffle.

If you couldn't already tell, I think this anecdote is horseshit on several levels. Anyone that works with computers knows that producing true randomness is very hard to do (an entire branch of cryptology is devoted to this), and patterns in pseudo-random distributions tend to become more apparent with more samples, not less. Personally, I used iTunes' shuffle exclusively on a set of several thousand songs over the course of a few years, and it most definitely picked winners and losers, so Mr. Smug Engineer can get stuffed.

Nevertheless, the fact remains that if you randomly sample from a set (whether it's really random or pseudo-random), you're going to get repeats, and that's a drag when you feel like you're hearing the same songs (or watching the same rerun of your favorite show(s)) over and over. The solution to this problem is to use any ol' pseudo-random shuffle but ensure that each item is removed from the list of available items once it has been played until every item has been played. Rinse and repeat.

Plex has a way to do this, but it's not obvious, and it builds from their "smart playlist" feature. With this in mind, you would think 'step 1' would be to head over to the 'Playlists' page, but this is unintuitively not the case. No, you have to go to main page for the type of file you're wanting to randomize (in my case, TV shows):


and, if there are any tabs for "recommended", "library" and/or "playlists," again do the unintuitive thing and *do not* go to the "playlists" tab. Instead, go all the way to the left, where it says "All", click on it, and at the bottom of the menu that pops up, look for "custom filter...":

Here, you can use search terms and keywords to filter down to the criteria you need. For example, "show title" "contains" "Futurama":


Now, here's the important bit: click on the plus sign (+) in the circle on the far right, past your search field to add a new set of criteria. From here, instead of "show title", look for "unplayed episodes" and set the next field to "is true". Click on "save as" to give your playlist a title, and it will now appear in your playlists tab, with a little gear in the corner to denote that it's a dynamic "smart" playlist:

Now, when you go to play from the playlist, use the shuffle option and it will shuffle among the remaining unplayed episodes *only*. Eventually, you will exhaust the playlist and need to go back to the show and mark it as "unplayed" to refresh the pool of episodes.

Analytics Tracking Footer