Tuesday, December 22, 2009

Testing Ubuntu 10.04 Lucid Lynx Alpha 1

The latest version of the popular Ubuntu Linux distro, known as Lucid Lynx, was just released the other day and, though it is an early alpha release, I wanted to give it a shot in a virtual machine. Installation in VirtualBox was smooth and polished, but I ran into some problems with installing VBox's Guest Additions, which allow for higher resolutions and, more importantly, mouse pointer integration (the magic that lets you move your cursor from host to guest OSs without mucking around with capturing the mouse pointer).

Here is a simple fix for the mouse pointer integration:

Fire up a terminal and type:
sudo gedit /etc/X11/xorg.conf
This file used to be how Ubuntu managed devices attached to your computer, but they're trying to move away from it. Now, the system will accept such a file, but it tries to figure things out on-the-fly as much as it can, hence the currently-empty file.

So, into this empty file, copy/paste:
Section "InputDevice"
Identifier "VBoxMouse"
Driver "vboxmouse"
Option "CorePointer"
EndSection
All this is doing is telling your virtual machine to look for the vboxmouse driver and use it. Now, when you reboot, you should have proper mouse integration.

However, if this somehow causes problems and you want to undo it, just type into a terminal:
sudo rm /etc/X11/xorg.conf
and then reboot your system.

To fix the small resolution, you just need to add another section to your xorg.conf, so type into a terminal:
sudo gedit /etc/X11/xorg.conf
and below the mouse section, paste in:
Section "Screen"
DefaultDepth 24
SubSection "Display"
Depth 15
Modes "1920x1440" "1920x1200" "1900x1200" "1920x1080" "1600x1200" "1680x1050" "1600x1024" "1600x1000" "1400x1050" "1280x1024" "1440x900" "1280x960" "1366x768" "1280x800" "1152x864" "1280x768" "1280x720" "1024x768" "1280x600" "1024x600" "800x600" "768x576" "640x480"
EndSubSection
SubSection "Display"
Depth 16
Modes "1920x1440" "1920x1200" "1900x1200" "1920x1080" "1600x1200" "1680x1050" "1600x1024" "1600x1000" "1400x1050" "1280x1024" "1440x900" "1280x960" "1366x768" "1280x800" "1152x864" "1280x768" "1280x720" "1024x768" "1280x600" "1024x600" "800x600" "768x576" "640x480"
EndSubSection
SubSection "Display"
Depth 24
Modes "1920x1440" "1920x1200" "1900x1200" "1920x1080" "1600x1200" "1680x1050" "1600x1024" "1600x1000" "1400x1050" "1280x1024" "1440x900" "1280x960" "1366x768" "1280x800" "1152x864" "1280x768" "1280x720" "1024x768" "1280x600" "1024x600" "800x600" "768x576" "640x480"
EndSubSection
SubSection "Display"
Depth 8
Modes "1920x1440" "1920x1200" "1900x1200" "1920x1080" "1600x1200" "1680x1050" "1600x1024" "1600x1000" "1400x1050" "1280x1024" "1440x900" "1280x960" "1366x768" "1280x800" "1152x864" "1280x768" "1280x720" "1024x768" "1280x600" "1024x600" "800x600" "768x576" "640x480"
EndSubSection
Device "Device[0]"
Identifier "Screen[0]"
Monitor "Monitor[0]"
EndSection
Important: Each of the lines that start with "Modes" should have all of the resolutions following it on the same line, and they should only include resolutions that your monitor can actually produce, so you might have to delete some of them (e.g., my monitor is a 20" that only goes up to 1680x1050, so I deleted all of the resolutions that were greater than this).

Again, if this causes any problems, you can either delete the section of the xorg.conf file or delete the xorg.conf file entirely and then reboot to get things back to the way they were.

Shared folders between the guest and host also appear to be broken at the moment, but I don't know what to do about it. Other than that, things have gone well for me. Compiz works fine and I have a fancy composite desktop with wobbly windows and true transparency.

Sunday, November 29, 2009

Using Gizmo5 with Google Voice to call landline and mobile phones

I, like many others, pay a lot for home phone service, which is becoming increasingly obsolete with the ubiquity of cellular phones. In an effort to cut out this mostly needless expense, I decided to try and combine two free services, Google Voice and Gizmo5, to make and receive free calls with actual landlines and cell phones via my existing internet connection.

The concept works like this: when you sign up for a Gizmo5 account, they assign to you a free SIP number, which you can basically think of as an IP-based phone number. This is already pretty cool, but the catch is that only other IP-based phones can call this number, and that's where Google Voice comes in. Through this free service, Google will connect any number--physical or SIP--with any other number--again, physical or SIP. Once the initial connection is made (the hard part for Gizmo), Google steps out and you're left with a working SIP-to-landline call without a phone line and without paying a dime.

To get this sweet deal going, you have to have an account with both services, which could be the biggest stumbling block: Google Voice is currently in an invite-only, privite beta stage and Gizmo5 has stopped accepting new registrations after it was recently acquired by Google (existing accounts still work, though).

If you've managed to snag some accounts, though, and they are all set up (you've chosen a local phone number for Google Voice, Gizmo has assigned a SIP number, etc.) you're ready to get started.

First, open your Gizmo5 account in your favorite web browser and find your SIP number (it will have an area code of 747):

Next, open your Google Voice account and click on 'Settings.' Under the 'Phones' tab, click 'add another phone' to forward your calls to:

Name it something recognizable (I called it 'Gizmo'), type in your Gizmo SIP number into the second blank, and then select 'Gizmo' from the pull-down menu:

Next, we'll want to install the Gizmo5 client on our computer (you can also use the gizmocall web-based interface, but it is made in flash and feels a little kludgy). Go to Gizmo's download page and download the client program for your operating system. If you're using Linux (like me), you'll notice that this is a bit of a problem, as the links are all missing. Luckily, you can still download the deb installer file for Debian-based distros, such as Ubuntu, from a direct link. UPDATE: the Linux download page is back!

Once the client is installed and running, you can enter your Gizmo account information and login. You can also choose to configure the client to manage your IM accounts, but I chose not to.

From now on, calls made to your Google Voice number--which is accessible to normal phones, either landline or cellular--will cause your Gizmo5 client to 'ring.' That means we can now receive calls from normal phones on our computer! We can also make calls to normal phones, but the trick is to use Google Voice instead of Gizmo's built-in (for-pay) calling feature:

When you click 'connect,' Google will call your Gizmo client (you answer it when it rings) and then call the number you have entered, merge the two calls, and then step out, just like your own personal secretary:


Conclusions

This method is not a perfect replacement for a home telephone. It only works when you have internet access (the silver lining of which is that you can use it at Starbucks, your hotel room, etc.; anywhere with a broadband connection). More importantly, it doesn't provide emergency 911 access, so if your house catches on fire, you'll just have to watch it burn because the fire department won't be able to look up your information via your phone number.

Furthermore, this method may not work forever. Google has just purchased Gizmo, so things are sort of up in the air until they figure out what they want to do about the way the services interact. Hopefully, if anything changes, it will be for our--the users'--benefit.

There has also been speculation that Google is planning to fully integrate these services together and then make them run on a wifi-enabled mobile device (Android-based, of course). This will essentially create a mobile phone that only works within wifi, but that can make and receive calls to/from any other phone without the need for a carrier (no carrier means no contract, no fees, etc.). That is, a fully ad-supported phone powered entirely by Google services and software.

Google, if you're reading this with your all-seeing robot eyes, please make it happen as soon as possible.

Tuesday, October 6, 2009

HandBrake Nightlies for Windows

Update (4/26/10): I will no longer provide these packages because the HandBrake devs are now providing real-deal official nightlies: http://build.handbrake.fr/

**These are UNSUPPORTED, BLEEDING EDGE builds of HandBrake. DO NOT ask for help in the HandBrake forums if you run into any issues with them. If you have a problem, ask it here and I will try to help. Otherwise, YOU ARE ON YOUR OWN.**

Additionally, these are not true nightlies because I won't be building them quite that often, but I plan to compile a new version each time a substantial update (such as an x264 bump) is checked into the SVN repository.

The CLI binaries are cross-compiled on my Linux box and the GUI is built natively in Windows.

Friday, October 2, 2009

Cross-compiling HandBrake for Windows on an Ubuntu Linux Host

I wanted to use an up-to-date build of HandBrake on my Windows machines, but I am not comfortable building from source in Windows. Thankfully, the HandBrake devs recently switched over to a cross-compile-compatible build chain using MinGW, so it's possible to build Windows executables from my Ubuntu box.

To start, we'll download the standard HandBrake dependencies, which you would already have installed if you've built it on a Linux system before:
sudo aptitude install subversion build-essential m4 wget autotools-dev yasm autoconf intltool libtool libbz2-dev zlib1g-dev
Next, we'll download the MinGW packages, which will install a Windows-compatible build chain on top of your Linux system:
sudo aptitude install mingw32
Then, we'll pull down the latest code from the SVN repository:
svn co svn://svn.handbrake.fr/HandBrake/trunk HandBrake
Switch to the newly downloaded code:
cd HandBrake
Then get the build started:
./configure --launch-jobs=0 --cross=i586-mingw32msvc --launch
Things will chug along fine until the build script reaches the LAME library, at which point it will fail during the configure script with an error:
"configure: error: CHECK_TYPE_uint32_t - please report to lame-dev @ lists.sourceforge.net"
To correct this, we'll need to open the configure script in a text editor:
gedit build/contrib/lame/lame/configure
and then do a 'find and replace' to change all instances of this:
FILE *f = fopen ("conftest.val", "w")
to this:
FILE *f = fopen ("conftest.val", "wb")
After that, just go into your build directory and restart the build script (it will automatically remember that we're compiling for Windows):
cd build ; make
You'll have to do the same thing for libogg when it fails. Apparently, this problem is somehow related to autoconf... Once the script finishes, you should be left with a shiny new binary named HandBrakeCLI.exe!

Wednesday, August 12, 2009

Beginner's Guide to SF4 Model Editing

Model editing is still being perfected, but it's currently possible with a few caveats.

First, download piecemontee's SF4 Assets Explorer. This is the cornerstone of model editing: http://sf4mods.pbworks.com/Utilities#piecemonteesSF4AssetsExplorer

Next, you'll need a 3D modeling program. I use the open source Misfit Model 3D because it preserves some coordinates and whatnot that seem to get dropped from other, more capable programs, such as 3D Studio Max (from what I hear from other modders; I have no experience with 3DS): http://www.misfitcode.com/misfitmodel3d/download.html

Once you have your tools, open the SF4 Asset Explorer and click 'Load file...'
Now, navigate to the costume file you wish to edit:
Click on the plus signs next to the path and the first entry marked "#EMB ([***]_01.obj.emo):
If you click on a model element, it will isolate it from the overall character model, like so:
Now, right-click on the element's name and select "Extract file...":
Name it something informative and give it the extension ".obj":
Next, open the file using Misfit Model 3D:
From here, you can move around vertices as much as you want, but you CANNOT add new ones or remove any. The number must stay EXACTLY THE SAME or you cannot re-inject it back into the model:
After you're finished editing, save the file and uncheck the option to "Save normals" (actually, I don't think this matters):
Now, back in the SF4 Assets Explorer, select and right click on the element you edited and choose "Inject file...":
Select your edited model and click "Open":
Now, when you refresh the model in the Asset Viewer, you will see your edits have taken effect:
The program will automatically create backups whenever you inject models, which is nice, but you should still be careful about overwriting because there is no "Undo." This edited model should now be ready to drop into your C:\Program Files\CAPCOM\STREETFIGHTERIV\Battle\Chara\*** folder to replace your old costume file.

Monday, July 20, 2009

Test Drive of UbuntuOne Private Beta

I signed up for Canonical's UbuntuOne private beta last week and just got my invite today. The service lets you upload files to Canonical's servers where you can seamlessly sync directories and files across any number of computers. This is generally known as 'cloud storage.'

When you sign up, you are directed to add their UbuntuOne repository and download/install a small gtk applet (only compatible with Jaunty and higher) that will integrate the service with your Ubuntu installation. On my Karmic alpha system, the applet had already been installed, which is what led me to seek out the service in the first place.

There are two main ways to access your cloud data: via the aforementioned system integration or through a fancy AJAXy Web interface:

The Web interface gives you a lot of management options, including file and folder management:

as well as options to add more users to share your files:

The GNOME integration is also super-swanky, with a notification bar applet that lets you connect/disconnect to the cloud:

and a folder that appears in Nautilus with a handy button that handles connecting:

I haven't run into any bugs/issues yet, but I'll update this post as things arise.

Monday, June 29, 2009

Compiz Fusion works in Virtual Machine running Ubuntu Karmic Koala

Something new about Ubuntu 9.10 Karmic Koala that hasn't really been advertised as far as I've seen is that desktop compositing via Compiz Fusion is possible from inside of a virtual machine. I believe this is due to recent changes in the way the kernel handles video memory, though I'm not sure. I don't think it is particularly caused by the version of VirtualBox that I'm using because my Intrepid VM is still confined to a flat, ho-hum desktop. Regardless, it's big news for me because I am forced to work in Windows for the most part at my job, but I always have Ubuntu running in a VM for most of my Web browsing (no viruses).

All of the plugins I have tried have worked, though ones that require fading in and out can be slow. Static transparency seems to work fine, though, as is demonstrated by the terminal window in my video. Also, wobbly windows and the desktop cube work swimmingly.

If you have any input on why Compiz suddenly works within the VM, please let me know.

Friday, June 5, 2009

Conclusions and Helpful Links

Continued from Installing the Hardware

That's pretty much it. Just plug it up and give it a shot. If you find that any of your buttons are acting funny, e.g. nothing happens when you press the button until you let go, try swapping the locations of the wires around on the button (i.e., move the wire from the bent post to one of the straight ones and vice versa).

Once again, here's what the final product looks like:


I've presented my own experience here, but there are tons of others' experiences elsewhere online. The Shoryuken.com forums have some really great info on pad hacking and DIY stick-making. You can also find some great things at the arcadecontrols.com forums (HarumaN is an expert and sells pre-hacked pads at reasonable prices) and xbox-scene.com forums (RDC has some great, thorough information about pad hacking, along with some good tutorials on how to salvage pads after a screw-up).

Gamingnow.net sells damn-near anything a stick-builder could want, all at very reasonable prices.

MAMErs can purchase I-PAC interfaces from Ultimarc. Another option that seems to be preferred on the Shoryuken forums is the Cthulhu board, which can be purchased at gamingnow.net.

UPDATE: even better than the Cthulhu is Toodles' new Chimp board, which provides PC/PS3 support and is designed to accept a hacked 360 common ground pad to provide 360 support with automatic switching among protocols. Plus, it's cheaper than bare Cthulhus used to be! You can get it and other stick materials at Lizard Lick.

UPDATE 3/25/11: Even better than the Chimp board, now you can get the Akishop PS360 triple-mod board, which is a no-solder board that supports PS3, Xbox 360 and PC all at once. It costs slightly more (~$45), but it completely removes padhacking from the equation for the first time ever. This and other arcade stick parts intended for fighting game enthusiasts are available at focusattack.com.

If you want to build a standard, semi-low-profile stick similar to what you would buy in a store, I recommend checking out some of the articles on slagcoin.com. The site has TONS of great information about all aspects of stick-making, and their button layout section is unparalleled.

You can learn more about sticks--including the differences between various brands--here. The section about restrictor plates should be considered required reading for any aspiring stick-jockey.

Page 1: Building an Arcade-style Fight Stick
Page 2: Assembling Your Box
Page 3: Pad Hacking
Page 4: Installing the Hardware
Page 5: Conclusions and Helpful Links

Installing the Hardware

Continued from Pad Hacking

After the Hell that is pad hacking, this part is a breeze and is pretty straigtforward. You just put the buttons into the holes you cut in your panel, then screw down the plastic nut to hold them in place. At this point, I wouldn't bother screwing them down too hard because you might need to rearrange/rotate them later.

Next, attach your microswitches to the buttons. This picture shows a standard cherry microswitch that came with my arcade buttons.

When you go to attach the wires from your hacked pad to your microswitches, the best method is to use .187 sized quick releases (or .110 for japanese-style buttons) rather than soldering the wires directly to the posts, which will make repairing/replacing buttons much easier in the future.

For the joystick, you'll need to drill mounting holes around your large-diameter joystick hole. The Happ stick I chose is a top-mounted stick, but I wanted a smooth surface (i.e., no visible screw/bolt heads) so I countersank the holes a bit and then covered the bolts with wood glue and wood putty before staining/sanding.

This is a pretty permanent solution for better or for worse (no way to reposition the mounting bolts), but I intend to continue using Happ sticks in the future, so it shouldn't be too much of a problem.

After the glue and putty dried, I did a light sanding and proceeded to stain the top and sides.

Once that's all set, you can attach your joystick base by threading the mounting bolts through the appropriate mounting holes and then screwing the nuts onto the bolts. Once you have the base of the joystick bolted into place, follow the instructions that came with your joystick for dropping the stalk into place. The instructions for my Happ were not very clear, so I'll explain my process: first, put the plastic ring--textured side-up--on the stalk, followed by the plastic spacer, then push the stalk through the base until it pokes out the other side next to the microswitches. Next, take the actuator (that funky square piece) and PRESS IT DOWN until you can snap the little clip into place to hold it (the fact that it can be pressed down was not mentioned in my instructions and I erroneously thought the spacer was missized).

After that, you just need to attach your pad to the microswitches via the quick releases. The ground attaches to the side post and the signal attaches to one of the two straight posts on the bottom (one side registers when the button is pressed, the other registers until the button is pressed).


Here is how my first attempt ended up (not so hot):


And here's my second attempt (a little better):

At this point, I added a few extra touches, including hinges for the top to maintain easy access to the wiring and some cabinet handles on the back which also double as cable wraps:


Also, as you may have noticed in some of the previous pics, I attached some staples from a staple gun to the bottom of the box interior. I then used cable ties to stabilize the pads against the staples and keep them from flopping around whenever I move the box.


Page 1: Building an Arcade-style Fight Stick
Page 2: Assembling Your Box
Page 3: Pad Hacking
Page 4: Installing the Hardware
Page 5: Conclusions and Helpful Links

Pad Hacking

Continued from Assembling Your Box

If you're not going to use the pad hack method and will instead use an I-PAC or similar control chip, you can skip this part, obviously. For this stage of the construction, I recommend you have an exacto knife, some thinnish wire (~22 AWG; I actually used an IDE hard drive ribbon), a soldering kit (soldering iron and lots of solder, helping hands with a magnifier, a good lamp) and a hot glue gun.

First off, you'll need to remove the outer shell of your controller, usually using a small phillips-head screwdriver.

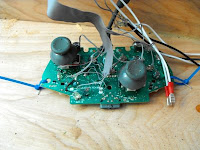
Once you're down to the bare PCB (printed circuit board), you'll see that all of the button contacts are covered in this weird black coating that solder won't stick to, so we gotta scrape that shit off to get to the sweet, sweet copper underneath it (you'll want to scrape off more than is shown in this picture; it's just an example).

I've heard of people using a dremel with a wire brush attachment to do this, but that sounds like a bad idea to me so I stuck with using an exacto with a square-ish blade (lay it almost flat against the board so you shave off the black stuff instead of scratching it off with the point/edge).

However you decide to do it, just make sure you don't damage the copper underneath because that's what we want to solder to.

Once you get a pair of wires soldered to their corresponding pads, I recommend you plug your controller into your PC/console and bridge the wires (i.e., touch the bare ends together to make a circuit) to verify that the correct button registers. If not, you'll have to figure out what went wrong and redo it. If everything works properly, take out your hot glue gun and encase the whole area in glue to make things sturdier and take the stress off of your solder joints.

Here's a picture of my first attempt, after everything was soldered and glued. I used some cable ties (slightly off-frame up above the pad) to clean up the horrible mess of mess of wires I made:

This is my second attempt, which used IDE ribbon instead of thicker wires. Looks much neater, eh?

After that's all finished, I recommend you attach the wires to a terminal strip or something similar so that you may more easily attach/remove buttons or--god forbid--another pad.

Here are some things regarding pad hacking that were not clearly stated in other sources I read online:
I used the official XBox 360 wired pad from Microsoft (unfortunately, the wireless pads are a total hassle and sometimes break inexplicably during the construction process). Unlike the Mad Catz 360 pad, the official pad does not seem to have a "common ground," which makes things a little harder. The pads with a common ground are set up such that the signal pad of each button can be grounded against the ground pad of almost ANY other button on the PCB. This makes for less soldering and fewer wires to connect to your buttons. In the case of the official pad, you'll need to solder wires to both pads of each button. The silver lining is that you don't need to muck around with any "solder plan" or daisychain any grounds.

So-called "trigger hacking" a.k.a. "set[ting] trigger to neutral" is a pain in the ass, serves no purpose that I can see and has the potential to cause serious problems. It involves desoldering the trigger potentiometers and removing the whole trigger mechanism, then soldering a 10k ohm resister to the leads to make the controller think it's always completely extended. Some people make it sound like this is necessary to even use the triggers, so I did it to my pads and ever since then my button readouts have been very strange (hitting a button doesn't map it to, say, joy1 button 1, but rather to joy1 button 1 joy3 button 1; that is, it thinks the controller is actually 2 controllers at once...). Instead of opening this can of worms, it appears that you could just leave the trigger mechanism and potentiometer intact, hot glue everything in place in the open position (to make sure nothing gets wonky while you're playing) and then solder to the points just like you would with a hacked trigger. Sounds much easier to me. The other option is just to ignore the triggers entirely and deal with the slight hassle of remapping the trigger-assigned button(s) every time you plug the stick into a 360.

Finally, it's easier to make these connections IMO if you place a small drop of solder on the copper pads and then attach the wire to that instead of trying to do it all at once, juggling solder, the PCB and the wire. If you should happen to mess something up, don't freak out; you can follow the lead from wherever you screwed up to the little dot (called a "via") where the lead pokes through to the backside of the PCB. Just scratch away some of the green coating there and you should be able to solder to it (RDC of the xbox-scene forums has a great tutorial for this process).

Page 1: Building an Arcade-style Fight Stick
Page 2: Assembling Your Box
Page 3: Pad Hacking
Page 4: Installing the Hardware
Page 5: Conclusions and Helpful Links

Assembling Your Box

Continued from Building an Arcade-style Fight Stick

As I said, I won't cover much here, but I will go over some of the tools I used in my construction. A router and table saw will make the job much easier, but you can get by with just a drill, some specialized bits and a circular saw.

For the button holes, I used a 1 1/8" spade bit, purchased at the local hardware store for about $5. You can either lay your button layout sheet directly on the wood and drill through it, or you can just mark the centerpoints and save the layout for later use. The only things to remember with using the spade bit are to make sure you go in straight and be patient to avoid it getting bogged down or stuck.

For the joystick hole, I used a 2 1/4" hole saw attachment. Again, take your time lest you end up with a costly waste of wood due to a misplaced hole.

I recommend attaching your pieces using pegs made of dowel rod and wood glue, since that will be much sturdier (and nicer looking) than just a bunch of nails. If you're a master carpenter, go ahead and do a dovetail joint or anything else that will improve the strength of the box, since you'll be beating the hell out of it on a regular basis.

Page 1: Building an Arcade-style Fight Stick
Page 2: Assembling Your Box
Page 3: Pad Hacking
Page 4: Installing the Hardware
Page 5: Conclusions and Helpful Links

Building an Arcade-style Fight Stick

In anticipation of Capcom's release of Street Fighter 4 on the PC, I decided to build a 2-player arcade console, similar to those available from X-Arcade. There are many options and choices to be made in such a project, as well as dozens of pitfalls, so I thought I'd share my experience to help inform anyone else who wants to give it a shot.

Step 1: Defining Your Goals

This is a pretty intense project, so you'll want to have a good plan from the outset. It can be costly to change your mind halfway through, so make sure you've decided as much as you can before you even get started. Some things you have to decide:

A. Which platform(s) do you want your stick to be compatible with?

Are you strictly a PC/MAME gamer? If so, you will probably want an I-PAC interface, which will make your computer see your stick(s) as a keyboard that is then easily recognized and mapped within your software. This is similar to the approach taken by X-Arcade and other PC-only arcade sticks. These control units are a mainstay of the DIY MAME cabinet crowd.

If, however, you play on a console such as the XBox 360, you might prefer doing a "pad hack" whereby you connect your arcade buttons to the circuit board inside of a console controller. This is what I chose to do because it allows me to use my sticks on my PC *and* on my friends' XBox consoles (thanks to the XBox's use of USB for their controllers). This method is a little more intense than using an I-PAC because you'll need to have a steady hand and some experience with soldering, but it's not terribly tough if you take it slow and exercise some care.

B. Which hardware do you want to use?

When it comes to arcade hardware, one size does not fit all. There is incredible diversity among sticks and buttons that varies by manufacturer, region (Japan vs America) and games that are intended to be played. For example, many competitive Street Fighter players prefer (to put it mildly) Japanese-style sticks (especially Sanwa), while Pac Man pros usually opt for ball-top American-style sticks. Furthermore, Street Fighters usually choose Japanese-style buttons, which are convex and have a shorter throw compared with American-style buttons. I recommend doing your homework and clocking in some time with a few different sticks before you make your choice because it's totally up to individual preference.

I grew up using Happ bat-top sticks and Happ's clicky, concave buttons in the local arcade, so that's what I went with. I purchased them from Tornado Terry on eBay at a really great price.

C. What kind of button layout will you use?

The button layout is almost as personal and important as the hardware selection, so again, you'll want to do your homework and try out a few things before making any major moves. Some prominent stick-makers are using an eight-button layout with four buttons in two rows (as in the Mad Catz Tournament Edition stick), but I often get lost on this configuration and end up accidentally scooting over to the wrong buttons during the more heated moments.

Again, Japanese- and American-style button layouts differ, with Japanese-style layouts having a staggered positioning that mimics the way your fingers naturally fall, while American-style layouts are straight across.

Slagcoin.com has a pretty great collection of sample layouts that you can use or you can modify one of them to create a unique layout that's all your own, which is what I did:

(since I modified it, the measurements may not all be accurate, so you're probably better off printing it out and working directly with the template if you plan to use this one)

I went with a Japanese-style stagger because I find it to be more ergonomic. Additionally, since I emulate a lot of Neo Geo games, I wanted to have four buttons in one of the rows to recreate that feel but not on both rows to avoid confusion. This fourth button in the bottom row also works perfectly as the 'run' button in certain Mortal Kombat games.

D. What materials do you want to construct your stick out of?

This is where you can really put a visible, personal touch on your creation and make something that is instantly identifiable. Arcade sticks are pretty much just boxes that you screw things to, so you can build a box from scratch using high- or low-quality materials, or you can repurpose a box from somewhere else to give your stick a "found materials" kind of look. I won't delve too deeply into this aspect of the construction process since I'm a shitty carpenter and you can definitely find more complete and informative guides to box-building elsewhere online.

I wanted something large, sturdy and attractive enough to leave in my living room, so I opted for a combination of red oak top and two sides paired with high-quality plywood (from the 'project' section of Lowe's, not that splintery shit from the lumber section) for the bottom and other sides. I then stained it with a dark stain and covered it with several coats of shellac, which made it look like an antique piece of furniture.

It didn't turn out perfectly due to my aforementioned shitty carpentry skills, but it passed the wife test so it's good enough for me.

Page 1: Building an Arcade-style Fight Stick
Page 2: Assembling Your Box
Page 3: Pad Hacking
Page 4: Installing the Hardware
Page 5: Conclusions and Helpful Links

Friday, May 29, 2009

Choosing an HTPC Keyboard and Mouse

I have a home theater PC (HTPC) and have spent a lot of time trying to find an ideal means to control it. While there are a lot of options available on the market, almost all of them fall short in some area.

I have tried quite a few cordless peripherals that all used the standard RF interface via USB dongle. These devices utilize the already crowded 2.4 Ghz frequency band, which you may recognize as the same frequency used by Wifi, many cordless phones and baby monitors. All this interference from other devices means you will have a lot of problems with dropped signals, missed clicks, etc.

Furthermore, optical mice really suck to use on your lap, so I knew I would need something a little out-of-the-ordinary. I have tried a Gyration Air Mouse, which was really neat, but it used an RF dongle and suffered from the aforementioned signal dropouts. :-( Furthermore, the Air Mouse is a delicate piece of machinery with several gyroscopes inside that can get out of alignment if the device is dropped a few times, which is almost unavoidable if you place it on the arm of your couch or chair.

Based on these experiences, my requirements are: Bluetooth, integrated cursor control and Linux support (since I use Ubuntu for my media center). Now, you would think that this sort of thing would be easy to come by and that there would be hundreds of options to choose from among a variety of vendors, but this is simply not the case. In my experience, there are only two viable options: the Logitech Cordless MediaBoard Pro and the Logitech diNovo Mini.

While the diNovo Mini is very cool, it is expensive (approx. $120 at the writing of this review) and the keyboard is of a strangely awkward size that makes it slightly too large for thumb typing but far too small for touch-typing. Additionally, its trackpad thingie in the upper-right takes some getting used to. On the plus side, it's small enough to fit into couch-side storage along with regular TV remotes or even in your pocket. It also has an integrated, clamshell cover that nicely covers the keys when not in use.

However, the small keyboard and funky trackpad thingie make it unsatisfactory for general computing, such as Web browsing and typing, in my opinion.

In contrast, the MediaBoard Pro is much cheaper (approx. $60 currently), but it is marketed for the Playstation 3 rather than for standard PC use. Do not let this scare you away. It syncs fine with both Windows and Linux via the standard Bluetooth stacks with minimal fuss (notice: Logitech also makes a non-Pro MediaBoard that uses 2.4 Ghz RF; make sure you don't buy it on accident) and the PS3-specific media keys can be easily ignored or repurposed with key-mapping software.

The MediaBoard Pro is a full-sized keyboard with all of the keys you would expect, including F-keys, Del/Ins/Home/PgDwn/PgUp/End keys, etc. The only key that is missing is the Windows key, which has been replaced by dedicated keys for left- and right-clicking. It also has an integrated trackpad--similar to those found on most laptops--off to the right, where the keypad would normally be located.

I found the trackpad to be responsive, if a bit on the small side, and it has an area on the right side that is dedicated to scrolling (similar to the mouse wheel) and worked quite well without any configuring.

Some minor quibbles: this keyboard feels very light and somewhat cheaply made, but I guess that's what you get for $60. Also, it has a glossy black finish which looks really nice at first but attracts fingerprints and tiny scratches like nobody's business. Lastly, I have a feeling that the silver finish on the accents will quickly rub off, likely leaving an unsightly unfinished plastic instead.

All in all, I think the Logitech Cordless MediaBoard Pro is the best option for anyone who plans to do any actual computing (typing, navigating, Web browsing, etc.) with their HTPC. If you intend to use a media frontend, such as MythTV or XBMC, the diNovo Mini might be a better fit, since it feels more like a conventional remote and those interfaces do not require as much mouse/keyboard action.

Friday, May 1, 2009

Monitoring a Directory to Automatically Invoke HandBrake

I've seen this question pop up a lot on HandBrake's forums and IRC channel, so I thought I'd make an entry about it here (Mac users skip down to the bottom for your directions):

Many folks have expressed interest in being able to specify a directory for HandBrake to 'watch' for new files that it would then automatically attempt to convert with predefined settings. I think most people are wanting this for use with devices, such as iPods, PS3s and AppleTVs, which require specific settings for videos to work. While HB doesn't support this functionality on its own (and the devs don't sound too interested in adding it), you can accomplish much the same thing in Ubuntu Linux using HandBrakeCLI and a little shell scripting.
WARNING: I'm a novice at scripting and there is definitely a more effective and elegant way of doing this. If you have a suggestion, please leave a comment! Similar steps will also work on other platforms/distros, so feel free to leave a comment about your successes or failures.

First, we'll need to install a utility to enable monitoring of directories:
sudo aptitude install inotify-tools
Next, we'll make some new directories in our home folder to hold our scripts and conversions. In a terminal, type:
cd $HOME ; mkdir HandBrake ; mkdir HandBrake/convert
Navigate to the newly created HandBrake directory:
cd HandBrake
and type:
gedit monitor.sh
This is where we'll write our script to monitor the 'convert' directory and invoke another script to do the actual conversion:
#!/bin/bash

inotifywait --monitor -e moved_to -e create ~/HandBrake/convert | while read dir;
do
(~/HandBrake/convert.sh)

done
Save, exit and--again--type:
gedit convert.sh
Here we will create our conversion script (be sure to put your desired file extension and preset in place instead of the bracketed reminders):
#!/bin/bash
for file in ~/HandBrake/convert/*
do HandBrakeCLI -v -i "$file" -o "$file".converted.[FILE-EXTENSION-GOES-HERE] --preset [PRESET-NAME-GOES-HERE] ;

#uncomment next line to delete original
#rm $file

done
Save and exit, then type:
chmod +x *.sh
to make both scripts executable.

Now, you can start monitoring by typing:
sh ~/HandBrake/monitor.sh
or you can set the script to run as a startup item where it will run continuously in the background starting the next time you log on.

Henceforth, any file you move or copy into the 'convert' directory will automatically convert to the desired format. This script will only work on one file at a time (i.e., you have to wait for the encoding to finish before dropping in the next file to convert). Also of note: HB will choke if the file is weird in any way--e.g. no audio track--and you'll have no way of knowing it if the script is running in the background, since it won't print any output.

Good luck and let me know if you run into any problems.

Bulk Encoding on Macs


Update (06/01/09): There's been a lot of clamoring on the Mac board of the HandBrake forums asking for bulk input of files to be converted using a preset. The devs have no interest in adding such a feature at this time because of the tremendous support headache it could cause, but you Mac users can do scripting to accomplish the same thing.

Just like the Linux users, open a Terminal (Applications > Utilities > Terminal) and type:

cd Desktop ; nano convert.sh
then paste in this (shift+ctrl+v; be sure to put your desired file extension and preset in place instead of the bracketed reminders):
#!/bin/bash
for file in ./*
do ./HandBrakeCLI -v -i "$file" -o "$file".converted.[FILE-EXTENSION-GOES-HERE] --preset [PRESET-NAME-GOES-HERE] ;

#uncomment next line to delete original
#rm $file

done
Save and exit (ctrl+x), then type:
chmod +x *.sh
to make the script executable. Now, just put the script into a folder with your HandBrakeCLI binary and you should be able to invoke the script (navigate to its directory in the Terminal by typing cd [space after cd] and then dragging your conversion folder onto the Terminal window and hit 'Enter,' then type ./convert.sh) and automatically convert any files within the directory using the chosen preset. I would recommend just keeping a folder around that you use for conversions and keep the script and HandBrakeCLI binary in there at all times, then you can just drop in the files you want to convert, start the script and go along your merry way.

UPDATE (12/20/2013): An anonymous reader shared his script, which sounds much more robust than mine:
inotifywait -r --monitor --quiet -e moved_to -e close_write --format '%w%f' /mnt/public/convert/video/android-hq/ | while read -r FILE; do echo "File copy detected" echo "Starting HandBrake..." (sleep 15 && /usr/bin/HandBrakeCLI -v -i "$FILE" -o /mnt/public/convert/output/video/"$(echo "$FILE" | cut -c38- | rev | cut -c4-| rev)android-hq.mkv" -e x264 -x weightp=0:cabac=0 -b 650 --audio 1 --aencoder faac --ab 96 --mixdown stereo --gain 3 --width 720 --loose-crop --decomb --markers --turbo --two-pass --vfr --subtitle 1 --native-language eng && sleep 15 && rm -rf "$FILE")& done
UPDATE (9/27/2014): The same user (name is teeedubb, apparently) is back with an update. This was posted in the comments but got mangled, so I tried to piece it back together:
I'm back - I have revisited the above script because it had some glaring faults - it would start a handbrakecli process for each file, which when encoding a seasons worth of tv shows it would bring my pc to its knees, it didnt handle files in sub directories, didnt handle multiple profiles and probably would have given undesirable results if a file extension had more than 3 character, plus it was kinda messy. New version below solves these issues: It queues encodes using task-spooler (tsp package in ubuntu), works with sub-directories in the watch folder (and deletes any empty subdirectories within watch folders) and supports multiple profiles. Options are 'watch directory', 'output directory' and 'task-spooler slots' (concurrent jobs) which are set through the variables. You can set multiple handbrake profiles which the script uses based on which directory the files are copied into, if files are copied into the root watch directory the first profile is used. Options for profiles are: 'name', profile name which will be appended to the transcoded file (this needs to match the profile directory and be fairly unique - script searches the input file location for profile name, so a profile called 'android' could confuse the script when transcoding the movie 'android cop'), 'handbrake settings', settings for handbrake to use (I'm pretty sure you could use --preset XXXX here as well), 'file extension', file extension for handbrake to use on output file and 'delete source file', whether or not to delete the source video file. You can create extra profiles by adding variables beginning with PRESET2 etc and adding elif entries to the if/then statement in the script. By default the script attempts to delete any empty subdirectories *and its ancestors* when completing a transcode, so you need to ensure you profile directories are not empty - I have done this by creating a hidden file in each profile dir and making the file un-deletable (eg: profile1 dir is /mnt/public/convert/video/android-hq, run the command touch /mnt/public/convert/video/android-hq/.android-hq && sudo chattr +i /mnt/public/convert/video/android-hq/.android-hq).
and here's the script:
#!/bin/bash
#script to watch a directory for incoming files and pass them onto HandBrakeCLI

WATCH_DIR="/mnt/public/convert/video/"
OUTPUT_DIR="/mnt/public/convert/output/video/"
TASK_SPOOLER_SLOTS=2

##HANDBRAKE PROFILE 1
PRESET1_NAME="android-hq"
PRESET1_HANDBRAKE_SETTINGS=" -e x264 -x weightp=0:cabac=0 -b 650 --audio 1 --aencoder faac --ab 96 --mixdown stereo --gain 3 --width 720 --loose-crop --decomb --markers --turbo --two-pass --vfr --subtitle 1 --native-language eng"
PRESET1_FILE_TYPE="mkv"
PRESET1_DELETE_SOURCE="yes"

###########################

ts -S $TASK_SPOOLER_SLOTS
inotifywait --recursive --monitor --quiet -e moved_to -e close_write --format '%w%f' "$WATCH_DIR" | while read -r INPUT_FILE; do

PRESET_NAME="$PRESET1_NAME"
HANDBRAKE_SETTINGS="$PRESET1_HANDBRAKE_SETTINGS"
FILE_TYPE="$PRESET1_FILE_TYPE"
DELETE_SOURCE="$PRESET1_DELETE_SOURCE"

if [[ $(echo "$WATCH_DIR" | grep -i "$PRESET1_NAME") ]] ; then
PRESET_NAME="$PRESET1_NAME"
HANDBRAKE_SETTINGS="$PRESET1_HANDBRAKE_SETTINGS"
FILE_TYPE="$PRESET1_FILE_TYPE"
DELETE_SOURCE="$PRESET1_DELETE_SOURCE"
fi
FULL_FILE_NAME=$(echo ${INPUT_FILE##*/})
OUTPUT_FILE=$(echo ${FULL_FILE_NAME%.*})
tsp bash -c 'nice -n 19 /usr/bin/HandBrakeCLI -v -i "$0" -o "$1""$2"-"$3"."$4" "$5" && if [[ "$6" = yes ]] ; then sleep 15 ; rm -f "$0" ; fi ; rmdir -p "$(dirname "$0")"' "$INPUT_FILE" "$OUTPUT_DIR" "$OUTPUT_FILE" "$PRESET_NAME" "$FILE_TYPE" "$HANDBRAKE_SETTINGS" "$DELETE_SOURCE"
done

Monday, April 13, 2009

My PPA Repository for Filthy Pants (HandBrake Repository)

After much more time and effort than I care to admit, I finally got Canonical's build servers to successfully build deb binaries for HandBrake in my PPA repository.

From here on out, I will no longer distribute packages through Rapidshare, which some people didn't like, and will exclusively use the PPA repository. I will regularly build development packages of HandBrake with both the GTK and QT4 GUIs (the CLI version will also be included with the GTK package).

To access my PPA repository through apt (so updates happen properly and so forth), hop on a terminal and type:
sudo gedit /etc/apt/sources.list
and add these lines at the bottom:
#Filthy Pants PPA
deb http://ppa.launchpad.net/hunter-kaller/ppa/ubuntu jaunty main
deb-src http://ppa.launchpad.net/hunter-kaller/ppa/ubuntu jaunty main
Save and close, then type:
sudo apt-key adv --recv-keys --keyserver keyserver.ubuntu.com 0x065fda2d23cfea71e753d04703e1fe8b2796dec2
After that, type:
sudo aptitude update
and you're all set.

Sunday, March 29, 2009

Ubuntu 9.04 Jaunty Jackalope on Acer Aspire One

If you use Ubuntu 9.10 Karmic Koala, please read this first (thanks Pjotr!):
In 9.10 Karmic Koala, there's the same problem with acer_wmi as in 9.04.

However, your 9.04 fix causes instability in the kernel, in 9.10. That's because the blacklisting should be done by editing the existing /etc/modprobe.d/blacklist.conf. And not by creating a new file named blacklist.

Blacklist.conf by default already contains a list of blacklisted kernel modules. You can simply add the following lines for acer_wmi:

# switch the wireless chipset on
blacklist acer_wmi
Original Post:
The new kernel in the beta release of Ubuntu 9.04 Jaunty Jackalope provides better support for netbook hardware including that of my Acer Aspire One, but it still has a few wrinkles that are fairly simple to iron out.

The first thing you're likely to notice is that the wireless connection doesn't work correctly out of the box. It should automatically load the open source ath5k driver and give you the option of using the proprietary madwifi driver (unnecessary in my experience), but you will get no signal and network-manager will have all of the options grayed-out/disabled.

To fix this, hop onto a terminal and type:
sudo gedit /etc/modprobe.d/blacklist
and add the line
blacklist acer_wmi
This should fix your wifi access (and possibly fix your wireless indicator LEDs[!]) in one fell swoop, once you restart.

Next, there is a known issue with the SD card readers stemming from Jaunty's version of the Linux kernel that causes the left reader to fail with this error:
mmc0: error -84 whilst initialising SD card
The left-side SD reader is otherwise not acknowledged, i.e. it doesn't create a /dev/ entry when cards are inserted and hotplug doesn't mount the disk (this problem also exists on the Dell Mini 9, so you guys can benefit from this too). To correct the situation, type into a terminal:
sudo gedit /etc/modprobe.d/options
and add (be wary of line breaks; I recommend copy/pasting instead of manually typing):
options sdhci debug_quirks=1

ProblemType: Bug
Architecture: i386
DistroRelease: Ubuntu 9.04
Package: linux-image-2.6.28-6-generic 2.6.28-6.17
ProcCmdLine: User Name=UUID=e309fb14-05db-4e9a-b137-c6bf63eeb6a4 ro quiet splash elevator=noop
ProcEnviron:
SHELL=/bin/bash
LANG=it_IT.UTF-8
ProcVersionSignature: Ubuntu 2.6.28-6.17-generic
SourcePackage: linux

Reboot and most everything should work properly, hotplugging and all. Also to be aware of, the right-side reader does not work properly if there is not a card in it at boot. In this case, it won't show any trace anywhere that you even have a right-side reader.

For both of these fixes, all we've done is created a text file that the system loads as it boots. If you wish to undo these fixes, you can just delete the text files and it'll go back to normal.

Finally, ctrl+alt+backspace doesn't kill the xserver anymore in Jaunty because people were apparently pressing it accidentally...? You can supposedly re-enable it (if you like) by installing a program called dontzap:

sudo aptitude install dontzap
and then typing into a terminal:

sudo dontzap --disable
Unfortunately, this did absolutely nothing on my system. Maybe you'll have better luck. In the meantime, you can either restart your entire system, or hit ctrl+alt+F1 to drop down to a console and type:
sudo /etc/inti.d/gdm restart
A scary blue and red error screen will pop up notifying you that there's already an xserver running, to which you can just hit OK and it will restart with the new one.

I've been using the netbook remix, which is really attractive and easy to use. Its launcher menu is incompatible with Compiz-fusion, but it looks nice enough that I don't even miss compositing.

Also of note, suspend actually seems to work now instead of totally borking my system, and the integrated mic/webcam seem to work much more reliably now.

Let me know if you have any issues and I'll try to help resolve them.

Wednesday, March 4, 2009

New Directions for Building HandBrake SVN

Update (5/15/09): I have working binaries available in my PPA repository. Directions for adding it to your package manager are available here.

A couple of months ago, the HandBrake devs implemented some major changes to the build procedure for HandBrake from the project's SVN repository. I'm not really sure why they did this, but it seems to have cut a couple of dependencies, which is nice*. Here's the new method that worked for me on Ubuntu 8.10 Intrepid Ibex and 9.04 Jaunty Jackalope (adapted from their build instructions in the readme).

Step 1: download the dependencies
In a terminal, type:
sudo aptitude install subversion build-essential m4 wget autotools-dev yasm autoconf intltool libtool libbz2-dev zlib1g-dev libglib2.0-dev libdbus-glib-1-dev libgtk2.0-dev libhal-dev libhal-storage-dev libgstreamer0.10-dev libgstreamer-plugins-base0.10-dev automake1.9 libnotify-dev libwebkit-dev
Update (6/18/09): as of svn 2550, libgtkhtml-3.14-dev was replaced by libwebkit-dev.
Users of OpenSuSE may need to download the additional dependencies zypper and in to build the CLI, as well as gtkhml2 and gtkhtml2-devel to build the GUI. Users of Red Hat/Fedora or derivatives may need to install the package groups "Development Tools," "Development Libraries," "X Software Development," and "GNOME Software Development," as well as zlib-devel, bzip2-devel, dbus-glib-devel, hal-devel, gtkhtml3-devel, gstreamer-devel, and gstreamer-plugins-base-devel.

Step 2: download the source from HandBrake's SVN repository
in a terminal, type:
svn checkout svn://svn.handbrake.fr/HandBrake/trunk hb-trunk
This will download a bunch of stuff and finish by telling you which revision you have checked out.

Step 3: switch to your newly created directory
in a terminal, type:
cd hb-trunk
Step 4: prepare the source for building
in a terminal, type:
./configure --launch
This command should take care of most of the remaining steps, i.e. making a scratch directory and compiling the source for both the CLI and GUI interfaces.

Step 5: install the GTK GUI
in a terminal, type:
cd build/gtk ; sudo make install
In you experienced any errors during Steps 4 or 5, you can attempt to run through the build functions manually:
In a terminal, type:
rm -rf build ; mkdir build ; cd build
then:
../configure ; make
and finally:
cd gtk ; make ; sudo make install


*Interestingly, the build process no longer invokes/requires jam, which had always been a vestigial requirement left over from HandBrake's roots in the venerable BeOS.

Monday, February 23, 2009

Bacon Weaving

My wife has been a busy bee blogging all of our exciting meals, my favorite of which has been our sexy bacon-wrapped food ball. In the process of making this meaty abomination, we employed a bacon-weaving technique that was popularized online through the 'bacon explosion.' For the benefit of the uninitiated, I thought I'd explain a little about the weaving technique in this quick post.

First off, we made our bacon easier to work with by freezing it. Just open the pack of bacon and lay the strips out on wax paper, then throw them in the freezer. This is the way restaurants often order their bacon, but us civilians are supposed to deal with it the hard way.

Once it's frozen, just lay the strips out and weave them together, over/under-style. Here are some pics of my manly hands working their magic.


And this is what you're left with. I want a shirt made out of it...

Once that's all done, pop it in the oven on an oiled baking sheet, but don't use too much oil because this bacon fabric is going to make plenty of grease on its own; you just want to keep it from sticking before it gets started.

When it's half-cooked, you can wrap it around other foods, or you can lay it over a mold--such as a metal bowl--to finish cooking and end up with an awesome all-bacon bowl.