Friday, May 11, 2012

Beginner's Guide to Custom Colors in SFxT


Update: The steps from this tutorial have been automated. You can now do all of it easily from sloth86's EMMEdit tool.

Street Fighter x Tekken handles colors in a completely different way from Street Fighter 4 and its derivatives as a result of the color customization feature. Instead of just pulling colors and textures directly from the texture image, the textures look like this:
and the game calculates the appropriate color based on a series of numbers, which represent a color mix from the texture image's color channels. These numbers are stored in the *.obj.emm files--specifically the 'MatCol' attributes--alongside the various other object materials and material attributes.

There are two main ways to edit *.obj.emm files, manually via hex or using NanjouJ's MatEdit tool, which is a little more user-friendly than fiddling with hex codes. In this tutorial, we'll be using MatEdit to copy colors from another color file, rather than calculating the color from scratch. If you would like to calculate an entirely new color from scratch, this post from yajirobe does a good job of explaining it.

So, first thing, we need to make backups of any of the files we plan to mess with. Once you've done that, go download MatEdit from the AE wiki's 'tools' page and identify which files you want to work with. I'm going to be copying a color from one of Ryu's *.obj.emm files into one of Poison's.

Now, create a new folder (on your desktop or wherever) and copy matedit.exe and both Ryu and Poison's *.obj.emm files into it. Then, hold ctrl+shift on your keyboard and right-click somewhere inside that folder, and choose 'Open command window here':

 This will open a command line window, but don't freak out. I'm going to tell you exactly what to type in.

First thing, we want to export the materials from both of our files, using the syntax "matedit.exe export [target obj.emm file] [newfile.txt]." So, in my case, I'm going to type (replace PSN/RYU and poison/ryu as appropriate for your files):
matedit.exe export PSN_01_01.obj.emm poison.txt
and
matedit.exe export RYU_01_01.obj.emm ryu.txt
If done correctly, you should have two new files in your directory, in my case, poison.txt and ryu.txt. At this point, we're done with the command line for now, but don't close it yet because we're going to need it again later.

For now, open both files in the text editor of your choice. Notepad works, but I prefer Notepad++ (it's free and awesome; go get it).

Open both of the txt files in your text editor. You'll see a series of sections which correspond to the various objects that make up the character's model. In each section, there are a bunch of variables and values that tell the game how to render each object. The ones we're worried about today are the MatCol variables:
 You'll notice that I highlighted just the *R, *G and *B MatCols, which correspond to the red, green and blue color channels, respectively, and not the *A MatCol, which corresponds to the Alpha channel. You shouldn't mess with the alpha value if you're just trying to change colors. ;)

So, lets say we want to take the color of Ryu's pants--i.e., white--and copy it over to Poison's hair. To do this, we would hop over to our ryu.txt file and search for 'pants.' Then, scroll down through his 'pants' section until we find the MatCol subsection.
 In this case, I only have a single color, MatCol0 to choose from, but some models will have multiple color groups, such as MatCol1 and MatCol2. These MatCols represent the color groups that can be customized in-game, so make sure you're choosing the correct one.

Copy those values and then switch over the poison.txt file and search for 'hair.' Scroll down to the MatCol section and replace the values there with your new, copied values:
 Great, we're almost done.

The last step is to import the modified text files back into the target *.obj.emm file. So, back to your command line window (if you didn't listen earlier and closed it, just open a new one) and type:
matedit.exe import poison.txt PSN_01_01.obj.emm
Now you're ready to test it out. Copy the PSN_01_01.obj.emm file into your [install directory]\resource\CMN\battle\chara\PSN folder, overwriting the one that was there (you made a backup, right??) and go check it out.

If you had calculated a new color from scratch using yajirobe's instructions instead of copying the color from some other costume, you would go through the exact same steps, only using your calculated color numbers instead of the ones from Ryu's pants.

That's it. Have fun, share your work and always make backups.

Monday, March 12, 2012

Beginner's Guide to Custom Challenges using Waterine's ClgEditor


This tutorial will cover the very basics of using Waterine's ClgEditor tool to create your own combo challenges for SSF4AE. For this, we will need the ClgEditor and Dantarion et al's Ono! Editor.

When you first run the ClgEditor, click the button to 'Open...' and browse to your installation directory (usually C:\Program Files (x86)\Steam\steamapps\common\super street fighter iv - arcade edition), then go to ...\resource\battle\chara and go into the folder for the character whose Trial Mode you wish to modify. It should filter the folder contents such that the only file displayed is our desired CLG file, in my case, CMY.clg.


Once the file is loaded, you can see the list of challenge levels on the left. At the top of the window you should see a pulldown menu labeled 'Ultra Selection,' which lets you select which Ultra combo should be loaded for the challenge, and another pulldown labeled 'Target State,' which determines how the dummy (Dan) should act (for use with situational combos, like ones that must start with a counterhit or only work on jumping opponents).

The area underneath those pulldowns is where most of the fun happens.

In the 'Scripts' section, the first button from the left (looks like a sun) creates a new command, either an 'attack' or a 'script,' which you can choose between using the 'Criteria type' pulldown menu to the right. Attacks are just your normal actions while scripts are movement actions, like dashes and FADCs.

The 'Criteria indices' field tells the game which moves it should accept as a successful command. If any strength of a move will do, as is the case with many of the early challenges, you must include each index that fulfills the criteria. For a regular special move (light, medium, hard and EX), you would need entries for all four strengths.

Back in the scripts window, each command represents one discreet portion of a challenge, and you can show up to 8 on the screen. You can go beyond 8 in the list, but unfortunately the display doesn't scroll in-game, so the player won't be able to see the rest.

To the right, you can choose what on-screen instructions and input help to display from the respective pulldown menus.

So, lets say I want to change Cammy's first challenge from a simple Spiral Arrow to a Cannon Spike > FADC > EX Cannon Spike.

Step 1. Select the first trial from the levels list and hit the 'X' button under Scripts to delete the existing command. Then, click the sun button to create a new command. Our first command--Cannon Spike--is an attack, so choose that from the Criteria type pulldown.

Step 2. Next, we need to fill in the Criteria indices field with the indices for the move (I cheated and stole them from Challenge #3), in this case, 100, 101, 102, 103, 104, 105.

Step 3. Under 'On-screen command text's last pulldown menu, we want to select Cannon Spike, and under 'Help menu command text's last pulldown menu, we want to select Cannon Spike Input.

Great! There's our first command. Now, we need to make another.

Step 4. Click on the sun button again, but this time we're going to use a movement script, so select 'Script' from the Criteria type pulldown.

As in step 2, fill in the Criteria indices field with the appropriate inputs, in this case 325 (I stole that from a later challenge, as well; are you seeing a pattern here?).

Likewise, we'll fill in the On-screen command text and Help menu command text, which are a little weird for FADCs: in the first pulldown under On-screen commant text, choose 'EX,' and under the third pulldown, choose 'FocusCancel.' Then, under Help menu's first pulldown, choose 'EX' again, and under the third, choose 'MP+MK.'

Step 5. Alright, moving right along, click the sun button one more time and choose the 'Attack' criteria. Up until now, all of the moves we've wanted to use could be easily pilfered from other challenges. However, no challenge requires an EX Cannon Spike specifically, so we'll have to figure this one out on our own. To do it, open up the Ono! Editor and open Cammy's BCM file. You should see a window that looks something like this:

Click on the bottom button, labeled "Hitbox Table." It should open a new window that looks something like this:


There's a lot of really great information available in this window, but we really only need the numbers on the far left in front of the move names. So, scroll down until you find your desired move, in my case EX Cannon Spike, which is listed under #106 and #107. If the criteria type is an attack, you use the hitbox data number, if it's a script, you should use the script number (you can expand the header info in Ono! to see it).

Now, enter those numbers into the Criteria indices field, separated by commas and spaces as necessary.

Fill in the appropriate on-screen command and help menu text, and you should be all set. Click the save button and lets go check it out by copying it into our ...\resource\battle\chara\CMY folder (don't forget to make a backup!!).


Now, as a note, you can make your combos against any version of the characters' movesets you like (Super is the default, of course, but you can use movesets from AE, 2012 or even custom movesets created in Ono!), you just have to copy the appropriate BAC/BCM files into the ...\resource\battle\chara\*** folder to overwrite the ones that are already there.

If you create something cool, be sure to share your work with the community, and always always always make backups!

Saturday, March 3, 2012

xBR vs HQx Interpolation Filter Comparison

UPDATE: the comparisons in this post aren't a true representation of hq2x (more info in this post). The xBR shots are still valid, but don't put much weight on the comparisons without reading the other post for context.

This post compares the popular HQx interpolation algorithm with the newer xBR, which has been covered in some of my other posts. If you just want to download the filters, you can get them from the link at the bottom of the post.

Since Maxim Stepin created the HQx interpolation algorithm more than a decade ago, it has been the favored real-time interpolation filter for the emulation scene. The way it works is it looks at each pixel and then compares its color to that of the 8 surrounding adjacent pixels. If it finds a match, the filter then compares the resulting pattern with a predefined lookup table to guess what the original pattern was trying to represent.

For example, if we take a pattern like this:


and scale it up via nearest neighbor--that is, a straight upscale with no interpolation--you end up with this checkerboard pattern:

But, if you use HQ2x, you end up with this:

The algorithm guesses that the original pattern was trying to represent a diagonal line rather than a checkerboard pattern, so it fills in the gaps to compensate.

Recently, a Brazilian programmer by the name of Hyllian (aka Jararaca) developed a new algorithm that actually improves on HQx, known as xBR (stands for "a filter that scales By Rules").

xBR works much the same way as HQx insofar as it is based on pattern recognition, and it would upscale the above pattern with the same result. However, it goes further than HQx by using a 2-stage set of interpolation rules, which better handle more complex patterns such as antialiased lines and curves. The two main points that can be fine-tuned are the formula used to measure the distance between colors and the way the algorithm treats corners (more on the corners later).

Hyllian began development of xBR in 2011 as a plugin for Steve Snake's Genesis/Mega Drive emulator, Kega Fusion.

You can read more about Hyllian's algorithm here.

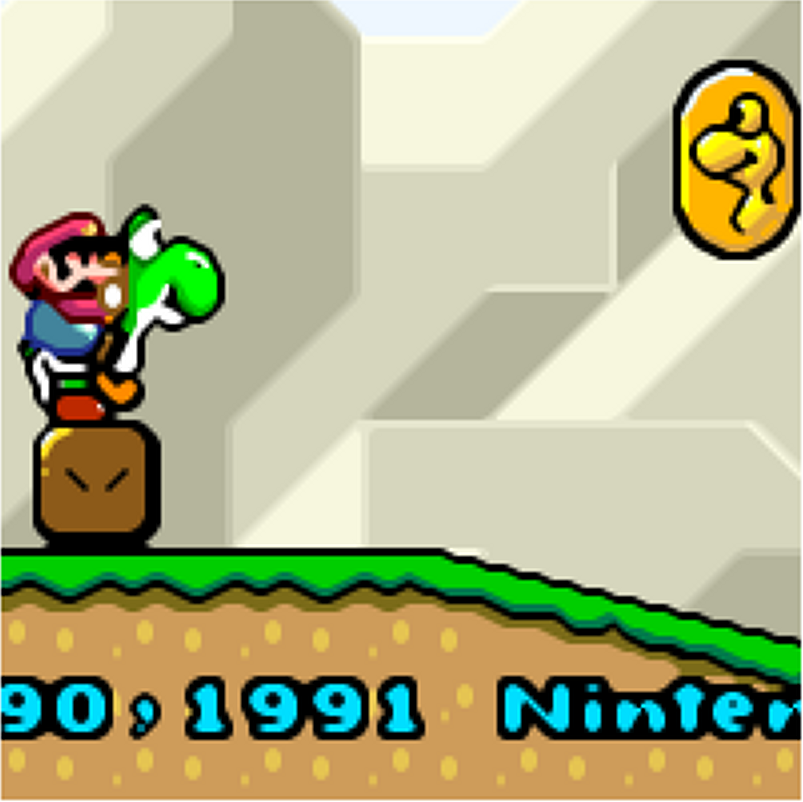
Lets take a look at how they compare on a real-world example (HQ2x on the left, 2xBR on the right; click to embiggen):


As you can see, 2xBR does a much better job on smoothing curves without getting chunky (see Yoshi's nose and the dragon coin). It also does a better job on the 'eyes' of the block, which is represented as a diagonal line with 2xBR compared with the series-of-squares look with HQ2x.

Here's another comparison, using Earthworm Jim's title screen:


And here's a third comparison, using the title screen to Earthworm Jim 2:


HQ2x actually does a slightly better job at getting a smooth gradient around the highlight in Jim's eye, but the rest of the image is a mess. xBR has smoother, straighter lines at every color transition.

Additionally, the xBR algorithm scales to higher scale factors much more easily than the HQx algorithm, making 3-, 4-, 5- and higher versions faster and more effective.

At very high scale factors (5 and higher), the xBR algorithm can obliterate some small details, such as pupils in eyes, dots, and so on, so Hyllian introduced some additional calculation to compensate (5xBR-v3.5a on the left [uncompensated] vs 5xBR-v3.5b on the right [compensated]):


Of course, this compensation comes with its own drawbacks and false-positives, so which version works better varies on a game-by-game basis.

UPDATE: Hyllian has made a third variant that is even more cautious. Here's an animated GIF comparing the way each variant handles text:
Another interesting aspect of this algorithm is that it works very effectively on images already upscaled with xBR, so you can easily get absurdly large images (scaled 1x, 3x, 9x and 27x) with just a few iterations:
This puts it in direct and favorable competition with this vectorization method that recently made the rounds. xBR manages to maintain detail a bit better than the vectorizer, and it can actually operate in real-time, unlike the vectorizer.

You can download these shaders from my Mediafire repo (most are available in either XML/GLSL or Cg format, both of which are compatible with SSNES). UPDATE: KrossX ported 2xBR-v3.5a to ePSXe format and SimoneT ported 5xBR-v3.5a.

UPDATE: New Cg version of 5x variant. Runs approx. 25% faster. :)
UPDATE: new XML versions of 5xBR-v3.7. This package includes 3 variants (a, b and c), as well as the A-variant+scanlines.

UPDATE: Hyllian has been working on a new version that analyzes an image frame by frame and dynamically decides whether to apply xBR smoothing or Reverse-Anti-aliasing to produce the best picture. It handles text better than any filter/shader I've encountered, and it also excels at digitized, prerendered images and backgrounds. Here's a shot of it with Final Fantasy VI on GBA:

You can download this shader here.

UPDATE (4/19/2013): Another great update from Hyllian, this time adding 3 levels of analysis. This version runs a bit slower in my experience (unsurprisingly), but it now handles jagged edges that earlier versions simply couldn't detect, due to their 2-level analysis pattern. Compare this shot with the ones at the top of the post:
Notice that inclined bit of ground under the dragon/yoshi coin. This new version will also really help with Mega Man X games, which tended to have a lot of these sorts of gently sloping planes. You can download a Cg shader of this new version here, or a 3x scale Kega Fusion plugin here.

Closely related to xBR are the SABR shader by Joshua Street and Zenju's xBRZ CPU filter. SABR was written by Mr. Street as part of a school project and it differs from xBR in a couple of ways, including using antialiasing on edges. It was forked from Hyllian's 5xBR v3.7c shader. xBRZ is a rewrite of the xBR algorithm in C++, with some changes to the corner detection and color distance measurement. It was forked around xBR v3.5.

There is also a standalone library written in C that incorporates both the xBR algorithm (as it appears in FFmpeg's libavfilter) and Hqx. You can browse this project's source on github.

Saturday, January 7, 2012

Apple iPod Nano 1G Recall

Due to a potential for exploding batteries, Apple recently instituted a recall on all 1G iPod Nanos, of which I had two (one with 2GB capacity and one with 4GB). I sent them off and, after a pretty long turnaround time (nearly two months altogether), I've received my first replacement: a brand new 6th generation touchscreen iPod Nano with 8GB capacity :D

If you happen to have one or more of the old models, I recommend you take advantage.

Friday, December 23, 2011

How to Download Region-Locked Japanese Games from Android Market

The content of this tutorial is pulled from this post on byuu's forum. I am copying it here for redundancy and search engine indexing. The copyright belongs to D--.

I've finally found a way to pull region and phone model locked Japanese games from the Android market, such as the new Shiren game by Chunsoft. I'm posting the instructions here so no other poor fucker ever has to go through figuring this out.

Basically speaking, these games are locked by both SIM region and firmware information. Companies like NTT DoCoMo offer a select group of handsets with their service, and these handsets have firmware that has been heavily hacked on the inside to brand it as such. In order to get such a locked game, whether free or for sale, onto your phone, you will need to make Android Market think you are running an NTT branded handset.

To do this, you will need the following:
  • A rooted Android phone
  • RootExplorer
  • Superuser
  • Market Access - this app is ad free and can run at boot
  • A barcode reader that can handle QR codes
1. Run RootExplorer and navigate to /system. Click the button to remount as r+w.
2. Long press on build.prop and select Copy. Paste it into the same folder or another folder to make a backup. You DO NOT want to lose this.
3. Long press on build.prop and select Edit in Text Editor.
4. Find and modify the following values (jacked from an NTT DoCoMo SHARP SH12C). Be aware they may not be grouped logically, so search the whole file if need bed. If a value doesn't exist, you will need to create it:
ro.build.id=S7140
ro.build.display.id=01.01.02
ro.build.version.incremental=01.01.01
ro.build.version.release=2.3.3
ro.product.model=SH-12C
ro.product.brand=DOCOMO
ro.product.name=SH12C
ro.product.device=SH12C
ro.product.board=SH12C
ro.product.manufacturer=SHARP
ro.product.locale.language=ja
ro.product.locale.region=JP
ro.mtp.manufacturer=NTT DOCOMO, Inc.
ro.sh_build.id=S7301
ro.sh_build.version.incremental=01.01.02
ro.build.product=SH12C
ro.build.description=SH12C-user 2.3.3 S7140 01.01.01 release-keys
ro.build.fingerprint=DOCOMO/SH12C/SH12C:2.3.3/S7140/01.01.01:user/release-keys
With it, I was actually able to purchase and install locked apps. In theory, if you have a tool like TitaniumBackup that converts installed apps to APK files, you could purchase an app, convert it to APK, then use the 15-minute return to get your money back. I have not done this because I don't want this kind of purchase pattern on my credit card, and because I'm willing to give Chunsoft 500 yen because that's a very fair price for Shiren.

5.  Close Root Explorer.
6.  Open System->Applications->All and scroll down to Market. Click Force Close and Clear Cache.
7.  Power off your phone. You absolutely must reboot your phone in order to populate the new values we just made in the RAM.
8.  Run MarketEnabler. Click the third tab and enter this for your SIM code: 44010. All NTT network SIM cards are branded 0xABEA.
8a.  Go to System->Accounts & Sync and add a NEW GOOGLE ACCOUNT. One that has never been tied to any phone. Create one if you must.
9.  Copy the URL of the program in the market and go to kaywa.com. Paste it in and generate a QR code.
10.  Take a picture of the QR code with your barcode scanner. When prompted, pick to use Market to open the link.
10a.  Immediately click the menu button and change your account to the new Google account you added to your phone.
11.  Agree to the Market terms and conditions.
12.  Congratulations! You can finally install the fucking game!

NOTE: I was finally able to isolate a strange bug in that your current Google count does not notify Google that it is present on a new device. Apparently, your phone information is only sent to Google when an account is first tied to your phone. If you wish to purchase apps in the market with the account you've added, you will need to use that account to log in. Make sure your Market app is also set to that account so automated downloading can begin.

Thursday, December 22, 2011

My New Das Keyboard

Newegg briefly ran a huge sale on Das mechanical keyboards, so I decided to shell out the money and pick one up. This post will cover my background with keyboards and switches, and then provide some information about the Das.

Background (feel free to skip it if you don't care)

I've been a dedicated touch typist for a number of years, though I have fallen out of practice since leaving professional writing as an occupation and have settled into a modest 85-wpm rut. Even so, the specter of repetitive stress injury (RSI) hangs over me and informs my decisions on which keyboards I will and won't use.

For years, I was drawn to the scissor-switch keyboards, which have a short travel, light resistance and are more common on laptops, rather than the more common "rubber dome" keyboards, which dominate the desktop keyboard market, due to the reduced fatigue on my fingers and wrists. A few years ago, though, I began using my grandfather's original 1989 IBM Model M keyboard, which features the delightful "buckling spring" mechanical switch, and was instantly won over. Rather than lug it back and forth from home to work every day, I asked my employer to purchase a Unicomp Customizer, which retails for approximately $80.
Diagram of a buckling spring switch.

The Unicomp is a joy to type on and feels identical to the original Model M I use at home. However, both keyboards suffer from 2-key rollover, which means that certain keys conflict with one another when pressed, such that the keyboard will ignore any further keypresses, sometimes with as few as 2 keys pressed. This is no big deal when typing because typists never need to press more than one key at a time (except for modifiers, like shift, of course). However, when playing computer games, rollover (sometimes known as "ghosting") becomes a serious problem, which is what led me to shop around for a gaming-specific keyboard.


The Das Keyboard Model S Ultimate

After poring over Overclock.net's exhaustive mechanical keyboard analysis and review thread, it seemed to me that there is a segment of the market that could be considered equivalent. These keyboards all use various permutations of the Cherry MX microswitches and provide N-key rollover (i.e., you can press as many keys as you want and they will never conflict with one another) when connected to the computer via PS/2 (via USB, they are all limited to 6-key rollover, which is a limitation of the generic USB keyboard driver, apparently). Out of the many options, I decided to go with the Das since it was on a hefty sale and I had a spare Newegg gift card to make it even cheaper.

Foreshortening makes the Model M
appear larger, but they are roughly
the same size.
Of the Das models available, I had my choice between blue and brown Cherry switches. According to reviews, the blues are tactile (meaning your fingers feel a haptic click when the switch actuates) and clicky, while the browns are tactile and non-clicky. I have grown accustomed to the clickiness of my buckling springs, so the blues were attractive to me. In practice, the clickiness is nice and familiar and the resistance is surprisingly even less than I'm used to from my buckling springs.

This pic shows the difference in pitch.
While the Model M is rounded, the Das
is straight and flat. I don't really notice
the difference during use, though.
For anyone who is familiar with arcade buttons, the Model M feels like clicky Happ buttons, while non-tactile Cherry blacks would be more like Sanwa buttons (no haptic feedback for when the button actuates). Tactile Cherry MX switches, like the blues and browns, are somewhere in between, probably more like the Seimitsu clickies.

Though I am a touch-typer, I would have preferred to get labeled keycaps on my Das, but the model with Cherry blues and keycaps wasn't on sale. In the future, I'll probably pick up a handful of colored/labeled keycaps, just to give myself a few more landmarks. Perhaps the letter 'P' and/or the hyphen key, and maybe a Tux keycap for the 'super'/Windows key...

An area smoothed by high traffic on
my Unicomp after barely 1 year of use.
Other aspects of the keyboard are all top-notch. The USB ports on the side provide handy access for plugging in a mouse or thumb drive, though the placement of the ports can interfere with mousing on cramped keyboard trays, like mine (see the bottom-right corner of my pics). The keyboard housing is solid, well-constructed and easy to clean, though the glossy, piano black finish really attracts and holds fingerprints. On the other hand, this type of finish won't develop smooth spots in areas of high traffic like the stippled/matte finishes would, so there's a trade-off.


Final Thoughts

Overall, I'm very pleased with the Das. For typing, I guess I still prefer the buckling springs, but the Das is most definitely satisfactory and still blows away any scissor-switch or rubber dome I've encountered. I would recommend this keyboard to anyone who is interested in a solid gaming keyboard that can do double-duty as a very competent typing keyboard.

In a typing comparison, I am able to achieve my same 85 wpm on the Das as with the buckling spring keyboards (as measured by TypeRacer), though the lighter actuation pressure on the Das leads me to bottom out on it more often. However, I think this is something that I could get used to over time and could potentially end up increasing my speed somewhat, once I grow accustomed.

If you would like to learn more and/or are considering taking the plunge on a mechanical keyboard, the aforementioned Overclock.net thread is full of information for potential buyers. To learn more about keyboards in general, the wikipedia has an excellent article covering the various technologies. If you have any questions about any of the keyboards mentioned in this post, feel free to leave a comment.

Update (3/07/2012): I talked my employer into picking up a Das Professional S(ilent) for me. This keyboard uses the Cherry MX Brown switches and features labeled keycaps, unlike the Ultimate I have at home.

While the switches are definitely quieter than the Cherry Blues, they are far from "silent" and are probably only a little quieter than my Unicomp. I'm pleased with this, though, since I like the clickity-clack anyway; it just annoys my office-mates a little less now. Additionally, the Browns require a slightly higher actuation pressure compared with the Blues, putting them more on the level of the Unicomp/Model M.

Typing feels light and sure. This is a very comfortable keyboard and I think most anyone will be pleased with it for typing, probably more so than with the Blue microswitches.

Here are a couple of pics:


Tuesday, December 20, 2011

Cg Pixel Shaders for SSNES


Update (11/08/2012): New shaders added to the end of the post.

In addition to XML/GLSL pixel shaders, SSNES also supports pixel shaders written in Nvidia's proprietary Cg shader language, which is similar in syntax to Microsoft's HLSL language. While Cg hasn't been a very popular language for shaders, historically, many new shaders have been written for use with PS3 homebrew, where Cg is the only supported shader language. In fact, these shaders were downloaded from TwinAphex's SNES9x Next source code repository.

Another benefit to the Cg shaders is that they work with both OpenGL and Direct3D drivers in SSNES, which makes many of the more modern shaders to available to people with poor OpenGL performance for the first time.

As with my previous shader posts, these images were captured at a 3x scale factor, then enlarged using nearest neighbor to 400% for the detail shot. Click the thumbnails to embiggen.

5xBR+CRT

This shader combines Hyllian's 5xBR algorithm with the phosphor-derived scanline shader from Caligari with great results. This shader is designed for use with square, non-aspect-corrected pixels, so be sure to use an 8:7 aspect ratio on SNES to avoid any nasty artifacting. It also expects at least a 5x scale factor, which looks like this:

Here are a few more pictures from the GBA version of Final Fantasy 6 and Street Fighter 3: Third Strike on FBA:

I find the scanlines make text easier to read than with 5xBR alone, for whatever reason.
Download the xBR pack from Hyllian here.

Retro

This shader accentuates the individual pixels by adding a cool, beveled look along with some color-tweaking mojo to give them a feeling of depth. Again, it expects non-aspect-corrected images, or else subpixel aliasing effects will make a mess of things.

Here's another picture at 20x (5x scale factor, enlarged 4x with nearest neighbor; see it full size to get the full effect):


Notable ports from the XML shader family include cgwg's CRT shader, Themaister's dot-n-bloom (listed as 'dots.cg') and Waterpaint shaders and an extremely fast implementation of bicubic filtering (bicubic-fast.cg) from Hyllian, as well as all the classics, such as HQ2x, SuperEagle and so on.

Update (11/08/2012)

CRT-ReverseAA

Hyllian has been working on some interesting shaders lately, including an implementation of Christoph Feck's "reverse anti-aliasing" algorithm, which allows for some very sharp, smooth upscaling. It works on any image but really shines on digitized images with lots of gradients (think: SNES games with digitized sprites or games with prerendered backgrounds, like Resident Evil or Final Fantasy 7). It's also particularly good at rendering legible text, so it's great for RPGs, as well. Here are some images of this shader paired with some scanlines:
 As you can see, Clay Fighter looks really great with this shader. Too bad the game is godawful.

bsnes-gamma-ramp

As with pretty much everything else, bsnes has taken some sophisticated steps to achieve an authentic gamma ramp that reflects the actual appearance of games. Themaister was kind enough to reproduce the relevant code in Cg form. This is how it looks:
He also wrote a cgp file (just a simple file that tells RetroArch how to deal with multiple Cg shaders) that will enable pixel blending used in pseudo-hires transparency, which bsnes-derived emulation cores typically render as a series of vertical stripes instead of the intended translucent color. You can download the bsnes-gamma-ramp+hires blending bundle here.

LCD3x

A simple, fast scanline shader from Gigaherz, LCD3x is intended to evoke the look of handheld console LCD displays:
It's also a very easy shader to customize, if you want darker scanlines or to brighten the overall image. These variables are located on lines 12 and 13 of the shader, respectively.

I'll add more shaders and more pics in the near future.

Analytics Tracking Footer