I just received my new AVS FPGA NES clone system from RetroUSB's Bunnyboy. This system differs from NES-on-a-chip hardware clones and RetroN5-style software emulation systems in that it is an FPGA-based hardware emulator. This gives it many of the advantages of a hardware clone (e.g., low latency, direct interaction with carts instead of dumping) with some of the benefits of a software emulator (e.g., firmware updates to add new features, etc.).
I won't rehash the info that's widely available elsewhere and will instead focus on things I haven't seen anyone talking about. But, just to get it out of the way, the graphics are perfect and the sound is just as crisp.
After facing a lot of compatibility issues with my original-run Analogue Nt and my Everdrive N8, the first thing I did was fire up my AVS+N8 to try some of the problematic games, namely Super Mario Bros. 2 USA and Ninja Gaiden 3. Both played just fine and I encountered no unexpected behavior.
Since the AVS doesn't do any expansion audio of its own--it just uses an analog-to-digital converter to pipe the audio from the cart or expansion device into the AVS A/V stream--it sounds as good or as bad as the original audio source. The N8's community mappers for Akumajou Densetsu and Gimmick! sound great, while the FDS expansion audio sounds...not so great.
There is also a screechy, sibilant thing accompanying certain sounds, but I suspect this will go away when I run the day 1 update. Speaking of which, it was harder than I expected to find the stuff needed to actually run the update. I didn't see any way to get them from directly RetroUSB.com's AVS page, which is where I would expect to find this sort of thing, but this post from NintendoAge has direct links:
http://nintendoage.com/forum/messageview.cfm?catid=106&threadid=166537
and you can sort through all of RetroUSB's downloads here:
http://retrousb.com/downloads/
To actually update the system, you have to connect the AVS to a computer and run the scoreboard application, which also includes a firmware uploading utility. Unfortunately, the scoreboard application is only available for Windows and Mac, which is a real drag for me, since I don't have either of those handy. Oh well.
Monday, September 12, 2016
Monday, June 13, 2016
Higan Special Chip Images
Higan's bsnes emulator uses low-level emulation (LLE) for the special chips found in some SNES games. Cait Sith's hardware page has dumps of these chips but it can be hard to find the split program/data versions needed for Higan, so here they are.
Saturday, May 14, 2016
Retro Receiver First Impressions
Despite the controversy, I've been very happy with my Analogue Nt and when Analogue announced that they had partnered with 8bitdo to produce the Retro Receiver, I put in an order with Play-Asia on day 1. It took a couple of weeks to arrive and I just received it yesterday, so here are my first impressions:
First off, it works as advertised! The receiver is powered by the NES' controller port, so no batteries or charging are necessary, and I was able to pair an 8bitdo Zero with it just fine (using the basic gamepad pairing mode, which you access by holding the 'start' button). I also tested pairing a Wii remote, which was a smooth, painless process, as well.
Controls are responsive, with no appreciable latency, as far as I could tell (I didn't do any scientific measurements, just operating on subjective "feel"). The automapped turbo buttons work great and are very handy.
The only complaint I had is that, on 8bitdo's pads, the NES' B and A buttons are physically swapped to match the lettering scheme used by 8bitdo (that its, Xbox 360-style, with A on the bottom and B on the right vs. SNES-style, with B on the bottom and A on the right). Correction: this is only an issue on the Zero; the other pads are fine. This is a real drag for games where you have already developed muscle memory and is terrible for Mike Tyson's Punch Out!! because it makes the left-side button do a right-arm punch and vice versa.
However, the Wii remote doesn't have this issue and the B and A buttons are mapped to the 1 and 2 buttons, respectively, as you would expect. Start and Select are mapped to minus and plus, respectively, which seemed backward to me, but that's not as big of a deal as the face buttons and is more easily ignored/adapted-to. With only two face buttons, you lose the turbo buttons, sadly. I had hoped to get around this with the Wii remote's Classic Controller attachment but it doesn't seem to work with the receiver. Update (9/22/16): it should with the latest firmware, I think. I think the Wii U Pro controller is supposed to work with it but I don't have one, so I couldn't test.
The receiver should also work with PS3 pads, but I haven't had a chance to test this yet. I'll update the post when I get around to that. Update (5/15/16): I got a chance to try it but didn't have any luck actually pairing up a DS3 with the receiver. I tried just pairing with the PS3 button, as well as plugging the controller into the receiver's micro-USB port via a USB OTG cable, neither of which worked. If anyone knows the trick, please drop me a comment! Update (9/22/16): ok, no wonder it didn't work: the pairing process is pretty involved. You have to download the pairing utility from here, plug the receiver and your DS3 into your PC or Mac (no Linux client, and it doesn't work via WINE; Note: if you're running Windows 8 or 10, you also need to either disable driver signing temporarily or install the dual shock pairing utility, which is helpfully included with the tools download), run the utility and then use it to pair the pad with the receiver. Whew!
For now, I think the sideways Wii remote provides the best experience (despite the lack of turbo buttons)--or the Wii U Pro controller if its buttons are mapped properly--unless/until 8bitdo provides a way to swap the button mapping on theother pads Zero.
For now, I think the sideways Wii remote provides the best experience (despite the lack of turbo buttons)--or the Wii U Pro controller if its buttons are mapped properly--unless/until 8bitdo provides a way to swap the button mapping on the
All in all, I think it's a great little accessory that fills an important niche created by Kevtris' HiDefNES HDMI adapter and bunnyboy's upcoming AVS FPGA NES (scheduled for release in late June). Now that we can actually play our carts on our gigantic flat-panel TVs, this receiver lets us sit back on our couches to relax and enjoy it. Update (9/22/16): I got my AVS and the receiver works great with it!
I would also like to echo the comments I've read elsewhere asking for an SNES version. Since NES and SNES use the same controller protocol, this should be a matter of just wrapping the same guts in a different plastic shell. Fingers crossed! Update (9/22/16): My wish came true and they did release an SNES version. The initial firmware that comes with the receiver uses some pretty strange mapping for DS3 pads, so be sure to update it to the latest, which should give a more sane layout. The updated firmware also adds support for Wii Classic Controllers, which is awesome! Strangely, plugging the SNES receiver into an SNES-to-NES adapter *does not work* and jumbles up your inputs. I was hoping to use a single DS3 to control both systems, but no such luck. :(
I would also like to echo the comments I've read elsewhere asking for an SNES version. Since NES and SNES use the same controller protocol, this should be a matter of just wrapping the same guts in a different plastic shell. Fingers crossed! Update (9/22/16): My wish came true and they did release an SNES version. The initial firmware that comes with the receiver uses some pretty strange mapping for DS3 pads, so be sure to update it to the latest, which should give a more sane layout. The updated firmware also adds support for Wii Classic Controllers, which is awesome! Strangely, plugging the SNES receiver into an SNES-to-NES adapter *does not work* and jumbles up your inputs. I was hoping to use a single DS3 to control both systems, but no such luck. :(
Sunday, April 3, 2016
SCART to JP21 Adapter - Solderless DIY
Most of my consoles are setup for RGB output via SCART connection, and SCART cables and converters are much easier to find than ones wired for JP21. However, my XRGB-Mini Framemeister only takes JP21, so I've searched all over for a low-cost SCART-to-JP21 adapter to no avail. There's one from a store in the UK that costs like $40+international shipping, which is just too expensive, IMO, and a SCART-to-Framemeister-mini-DIN from retro_console_accessories on eBay (the source for the best-quality retro gaming cables anywhere) for ~$30, which is a bit more reasonable but would cause wear-and-tear on the Framemeister's already-finicky mini-DIN port. Neither of these options seemed very attractive to me, so I figured I'd try the DIY route using a cheap Chinese SCART-passthru-breakout-whatever available for <$4 shipped on eBay:
They're sealed shut pretty well but the most effective strategy for cracking them open seems to be applying steady pressure on the sides toward the female end (the curved/scalloped part next to the male end is stronger). I used a C-clamp and slowly tightened it until the clamshell halves started buckling and then popped apart. A bench vise would work well, too.
Once you pop it open, you can cut the wires from the breakout jacks, which will clean out some of the rat's nest inside. In my case, all of the wires were black, which... isn't great:
The female side is soldered in and attached pretty tightly, but the male end is actually pretty easy to work with. Each of the spade-type prongs is secured with a little popout leg in the middle. You can squeeze that in with needle-nose pliers and then press the whole prong inward and pull it through from the inside:
Once they're all pulled through, you can rearrange them to match the JP21 pinout and push them back through, as per this key (not my pic, but I'm re-hosting it here because the original Tinypic hosting could vanish at any time):

 |
| I'm not altogether sure what the intended purpose of these things is but whatever... |
Once you pop it open, you can cut the wires from the breakout jacks, which will clean out some of the rat's nest inside. In my case, all of the wires were black, which... isn't great:
 |
| The input/output switch isn't glued in, so you can remove it and save it for another project. |
 |
| Here you can see one of the removed spade-prongs, with the popout locking mechanism. |
 |
| You'll notice the SCART side has one less ground and one more white, unlabeled prong than the JP21 side. I just left that prong out entirely (#12) and everything still seems to work fine. |
Once the prongs are all reordered, you can use a small pokey thing to engage the center-locks, no soldering required. I used a cheap dental tool I had laying around to do the job, but those little pointy electrician's tools (the ones that look like dentists' tools with screwdriver handles) should work fine, too. After that, just glue the casing back together and you should be all set.

Wednesday, March 9, 2016
Using Rollback to Hide Latency in Emulators
This is something I thought about a pretty long time ago but recently decided to flowchart out in case anyone wanted to implement it.
The way rollback-based netplay (e.g., GGPO and RetroArch's current netplay implementation) works with emulators is that the two players exchange input states (which are small enough to pass back and forth within the time of a single frame of emulation) and then when they diverge, you roll back to a previous known-good time where the input still agreed and then emulate the intervening frames with the corrected input data to catch up (in RetroArch, these are called 'lag frames').
I had an idea for hiding a frame of latency that would work similar to that concept but in a single-player situation (click to embiggen):
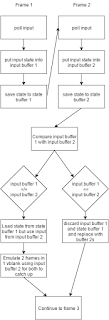
The way it works is whenever the player's input changes, you roll back one frame and apply the new inputs retroactively and then emulate two frames to catch back up. This makes your inputs go into effect one frame before you actually pressed the button(s). This wouldn't result in a rollback loop because, even though we feel like we press a lot of buttons all the time when we play a game, most of the time (particularly from the emulator's point of view) we're really just holding a button or two.
You would want the audio to run one frame behind the video, so your audio buffer wouldn't be constantly emptying and skipping around every time you roll back. Instead, it would fill back up with the next frame's audio during catch-up. Despite running a frame behind the video, our brains would unconsciously sync the audio with the video, as they are very forgiving about that sort of thing (this is a known effect).
One drawback is that you would frequently lose a single frame of animation but thankfully our brains are quite good at papering over that sort of thing, as well. The other drawback to this method is that it would require emulating two full frames in the space of a single frame, so the CPU requirements for any emulator using it would be doubled.
Again, this method would hide a single frame of latency. While most PC setups have significantly more than one frame of latency to contend with, every little bit helps.
UPDATE (4/12/2016): I was talking to letoram, author of ArcanFE, the other day and he mentioned that he had implemented something just like this recently and that the lagging audio made everything seem *more* latent, presumably due to the everything-syncs-to-the-slowest effect mentioned in the above link. I didn't ask him whether muting/disabling audio helped with this or not.
UPDATE (4/30/2018): A few months ago, Dwedit--the author of PocketNES and Goomba Color emulators for GBA--mentioned having a similar idea and after some brief planning and discussion, he whipped up a working model and then refined it into a functional feature for RetroArch. It's included in the 1.7.2 release under the name "runahead". Some differences in his approach to the one I described include keeping audio in sync (rather than lagging behind) and having the option of running a second instance of the core to hop over to in the case of audio issues. To avoid weird rollback effects (see: the 'lose a single frame of animation' thing in my original post), Dwedit astutely recognized that as long as you keep the number of rollback frames below the number of internal lag frames in the game (that is, the number of frames it takes for your input to cause a reaction on the screen), the effect is completely invisible to the user.
Friday, March 4, 2016
New and Updated Shaders
It's been awhile since I've done any shader posts, so I figured I'd cover some updates that have happened recently. Same format as usual, the only difference this time around is that instead of zooming into screenshots using photoshop, I made them straight from RetroArch using the 'zoom' from my image adjustment shader. This gives sharper, cleaner detail shots. Anyway...
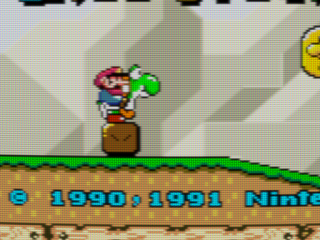
No Shaders (Nearest Neighbor)
Here is a shot with no shaders for comparison.


ScaleFx
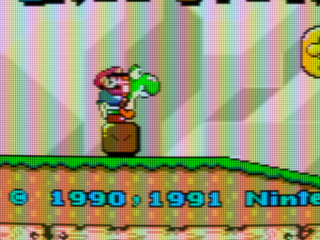
Sp00ky Fox had been working on cleaning up artifacts from the Scalenx shaders and, in the process, worked up a similar algorithm of his own, known as ScaleFx. By cranking it up to 9x, he managed to do some pretty impressive smoothing:


Some notable things here: check out the circle-c copyright symbol, which is very hard to deal with in this sort of shader, as well as the straight lines throughout the logo and on the shallow slope below the dragon coin.
He also made a variant, known as scalefx-hybrid-9x, that uses reverse-antialiasing and creates some interesting depth and shading effects:


It does introduce some haloing, though, and is pretty heavy, performance-wise.
xBR-lv2-accuracy-multipass
For the past year or so, Hyllian has been working to improve his now-famous xBR upscaling algorithm, mostly by pairing it with other algorithms and working to improve handling of problematic edge-cases. Very recently, though, he changed the way corners are detected and added a new color diff algorithm, which fixes some weird artifacts that could occur when bright red and bright blue pixels were next to each other (artifacts not pictured):


Here is an older version of the same shader for comparison:


Again, the copyright symbol is a good example of the improvements, along with the circles inside the number 9s. The updated version also works quite well with Playstation-era antialiased images, while ScaleFx works best on bold, cartoony graphics, like Super Mario World and Shantae.
CRT-Lottes Updated
Since we first ported Timothy Lottes' scaling pixel art shadertoy, he did a couple of iterations to add bloom and a few more variations on his awesome shadow mask code. r5 incorporated those updates into our port and threw in some runtime parameters (including the aforementioned mask variations):


This is the default compressed TV-style shadow mask^^.

This is the Trinitron-style aperture grille^^.

This is the stretched VGA-style shadow mask that was used in the original shader^^.


And this is another VGA-style mask with larger phosphors^^.
CRT-Royale-Kurozumi Preset
Shmups user Kurozumi posted some really nice settings for TroggleMonkey's CRT-Royale shader that makes it look very much like a high-res broadcast monitor (e.g., Sony's BVM line or the 800-line PVMs):


I put these settings into a cgp preset, located in the 'cgp' subdirectory of the main common-shaders repo.
No Shaders (Nearest Neighbor)
Here is a shot with no shaders for comparison.


ScaleFx
Sp00ky Fox had been working on cleaning up artifacts from the Scalenx shaders and, in the process, worked up a similar algorithm of his own, known as ScaleFx. By cranking it up to 9x, he managed to do some pretty impressive smoothing:


Some notable things here: check out the circle-c copyright symbol, which is very hard to deal with in this sort of shader, as well as the straight lines throughout the logo and on the shallow slope below the dragon coin.
He also made a variant, known as scalefx-hybrid-9x, that uses reverse-antialiasing and creates some interesting depth and shading effects:


It does introduce some haloing, though, and is pretty heavy, performance-wise.
xBR-lv2-accuracy-multipass
For the past year or so, Hyllian has been working to improve his now-famous xBR upscaling algorithm, mostly by pairing it with other algorithms and working to improve handling of problematic edge-cases. Very recently, though, he changed the way corners are detected and added a new color diff algorithm, which fixes some weird artifacts that could occur when bright red and bright blue pixels were next to each other (artifacts not pictured):


Here is an older version of the same shader for comparison:


Again, the copyright symbol is a good example of the improvements, along with the circles inside the number 9s. The updated version also works quite well with Playstation-era antialiased images, while ScaleFx works best on bold, cartoony graphics, like Super Mario World and Shantae.
CRT-Lottes Updated
Since we first ported Timothy Lottes' scaling pixel art shadertoy, he did a couple of iterations to add bloom and a few more variations on his awesome shadow mask code. r5 incorporated those updates into our port and threw in some runtime parameters (including the aforementioned mask variations):


This is the default compressed TV-style shadow mask^^.


This is the Trinitron-style aperture grille^^.


This is the stretched VGA-style shadow mask that was used in the original shader^^.


And this is another VGA-style mask with larger phosphors^^.
CRT-Royale-Kurozumi Preset
Shmups user Kurozumi posted some really nice settings for TroggleMonkey's CRT-Royale shader that makes it look very much like a high-res broadcast monitor (e.g., Sony's BVM line or the 800-line PVMs):


I put these settings into a cgp preset, located in the 'cgp' subdirectory of the main common-shaders repo.
Monday, January 25, 2016
Bash Scripts for RetroArch
EDIT: It seems blogger *really* doesn't like double-chevrons and it tries to replace them with >> so if you see that, it's supposed to be a double-chevron instead (>>).
I wrote a couple of bash scripts that could be useful for people using RetroArch and figured I'd post them here.
I wrote a couple of bash scripts that could be useful for people using RetroArch and figured I'd post them here.
First off is a script for 'dumb' scanning and playlist generation. That is, it doesn't check against any databases, so it catches things like ROMhacks and translations that don't appear in the No-Intro database that we use for the built-in content scanning:
#!/bin/bashWhen you run the script from a terminal/CLI, it will ask you to enter the path to the core library used to launch the content you're scanning, the path to the directory to be scanned and a name for the playlist, then it'll scan through the specified directory for any files and add them to a new playlist.
COUNTER=1
echo "Enter the absolute path to your core"
read core
echo "Enter the absolute path to the directory you want to scan"
echo "(exclude trailing slashes)"
read content
echo "Enter the name of the playlist"
read name
for i in $content/*; do
echo "$i" >> $name
echo "$i" | sed 's=.*/==' >> $name
echo "$core" >> $name
echo "$core" | sed 's=.*/==' >> $name
echo "$COUNTER|crc" >> $name
echo "" >> $name
done
Askot, a user from the RetroArch forums, made a variation in which you pass the variables directly at launch time instead of answering questions:
#!/bin/bashIt also removes the file extension from the playlist entries, which some people may prefer (e.g., Tetris instead of Tetris.nes). You would use it like this:
COUNTER=1
for i in $2/*; do
echo "$i" >> $3
echo $i | sed 's/\.[^.]*$//' | sed 's/.*\///' >> $3
echo "$1" >> $3
echo "$1" | sed 's/\.[^.]*$//' | sed 's/.*\///' >> $3
echo "$COUNTER|crc" >> $3
echo "" >> $3
COUNTER=$[$COUNTER +1]
done
./dumbscan /path/to/core.so /path/to/content /path/to/playlist.lpl
Reader Unknown commented that the above script(s) can fail on files with spaces in the names and will leave dupes if you scan the same directory multiple times. This version should alleviate those issues:
#!/bin/bashThe next script generates basic cue sheets for disc image files that don't have them already, like iso and img. This will make (most of) them usable with the Mednafen/Beetle-PSX core.
COUNTER=1
SAVEIFS=$IFS
IFS=$'\n'
if [ -f $3 ]
then
rm $3
fi
for I in $2/*
do
echo "${I}" >> $3
echo ${I} | sed 's/\.[^.]*$//' | sed 's/.*\///' >> $3
echo "$1" >> $3
echo "$1" | sed 's/\.[^.]*$//' | sed 's/.*\///' >> $3
echo "$COUNTER|crc" >> $3
echo "DETECT" >> $3
COUNTER=$[$COUNTER +1]
done
IFS=$SAVEIFS
#!/bin/bashYou would use it like this:
longname=`echo "$@" | sed 's=.*/=='`
name=`echo "$@" | sed 's/\.[^.]*$//' | sed 's/.*\///'`
if [ -e "$name".cue ]
then
echo "Cue sheet \"$name.cue\" already exists. Aborting."
else
echo "FILE \"$longname\" BINARY" >> "$name".cue
echo "TRACK 01 MODE1/2352" >> "$name".cue
echo "INDEX 01 00:00:00" >> "$name".cue
fi
./cuemaker whatever.iso
Subscribe to:
Posts (Atom)