Thursday, August 25, 2011

Intermediate Guide to SF4 EMG (Model) Swapping

Sloth86 has cracked model manipulation in SF4 wide open. It's now possible to swap models from character to character and costume to costume in a fairly consistent manner, thanks to sloth86's research. Additionally, he was nice enough to write simple, straightforward graphical tools that extend this ability to almost anyone. Just to be clear, though: this procedure often produces strange results, especially with respect to animations. Sometimes these results can be fixed through model editing, sometimes not.

In this tutorial, we're going to use sloth86's methods to take an EMG model from one character and replace it with an EMG model from another character.

First things first, lets get all of the tools we'll need. This is a pretty advanced procedure, so we're going to need piecemontee's SF4Viewer (aka, Asset Explorer), Kensou's Tool(s) and Sloth's tools, specifically, EMGSwap and DDSREFEDIT. Once you have those tools downloaded and organized, we're ready to get started.

First, identify which model you want to move and where you want to put it. I'm planning to take Guy's head (donor model) and place it on Ryu's body (recipient model).

Once you've got it all planned out, open both models (for me, GUY_01.obj.emo and RYU_01.obj.emo) in the Asset Explorer and find the desired objects--in my case Guy's 8th EMG (counting each model, starting from the top in the Asset Explorer's display)--and I'm going to replace Ryu's 12th EMG. The recipient's numbers are important, so write it/them down.
Now, select the donor object, right-click and choose 'Raw dump,' name it something informative (I chose face.emg) and click 'save.'
Next, armed with our model files and numbers, place both the donor *.emg file and recipient *.obj.emo file into the same directory as EMGSwap and double-click on EMGSwap to run it.

This window should pop up:
In the field labeled "Input EMO file," type the name of the recipient model, in my case RYU_01.obj.emo. Then, in the field labeled "EMG # to swap out," type the number of the recipient model you wish to replace, in my case 12 (for Ryu's 12th EMG model, the face). Next, in the field labeled "EMG file to swap in," type in the name of our raw-dumped donor model, in my case face.emg. Finally, in the field labeled "Output EMO file," we'll just leave the default 'new.emo' for now (we'll rename it to replace the old model later, but in the meantime, we don't want to mess anything up before we're sure it's cool).
Click 'Go' and cross your fingers. If all goes well, you should see a window like this pop up:
Looks good so far.

Now, lets check out our Frankenstein's monster by opening the 'new.emo' file in the Asset Explorer:
Yeesh, looks pretty freaky. Since Guy's head was sized and positioned significantly differently from Ryu's, we're going to have to change some things up to make it look normal again.

So, still in the Asset Explorer, lets select our newly imported model, right-click and choose 'Extract...' from the menu. Name it something informative--like face.obj--and click 'save.'
At this point, you might be asking yourself, "if I'm extracting and converting into an obj anyway, why didn't I just export from Guy's model and import straight into Ryu's model in the Asset Explorer, skipping all this EMGSwap bullshit?" Well, smarty-pants, most files in AE (including the *.obj.emo files we're messing with right now) include an index that includes the location and size of each and every file contained within. The Asset Explorer uses this index to determine what can and can't be extracted/injected safely.

However, sloth86's EMGSwap tool rewrites this index for us, so the Asset Explorer can safely extract/inject our borrowed models once EMGSwap has done its thing. Perhaps someday that same functionality will be integrated directly into the Asset Explorer (it's open source, after all), but that day is not today.

Anyway, so we've gotten our model swapped in, but it looks like crap and we'll need to use model editing to fix it. I'm not going to spend a lot of time on this part, since you should already know about model editing enough to fix things yourself. For me, Guy's head was the wrong size, so I needed to enlarge it and move it around a bit. I really should edit Ryu's neck to meet the head, too, but you get the idea...
Alright, with my edits in place, the model looks okay, but you'll notice that the skin looks all white and pasty. That's because it's looking to Ryu's first DDS texture, which corresponds to--you guessed it--his duffel bag. This is actually convenient for my purposes, since I can just replace the duffel texture with my donor texture. Thus, I won't need to edit a bunch of DDS references using sloth86's DDSREFEDIT tool, but you probably will (hence, why I included it in the tools you'd need to download).

I'm only going to use it a little, but I'll try to tell you more about it when the time comes.

In the meantime, we need to create some new texture and normal map containers to go with our new model. To do it, we'll use Kensou's sf4tool, just like in this earlier tutorial I made.

Open your donor's *.col.emb and *.nml.emb files in the Asset Explorer, find the textures that correspond to your donated model, right-click and choose to 'Extract...' them. Name them something informative (I used 'Guy.dds' and 'Guynmap.dds') and click 'save.'

Next, open your recipient's *.col.emb and *.nml.emb files in the Asset Explorer an extract *ALL* of his or her DDS textures. Be sure to name them something informative so you can remember which order they're stored (1.dds, 2.dds, etc. and 1nmap.dds, 2nmap.dds, etc. work well).

Now, as per the aforementioned tutorial, create new *.col.emb and *.nml.emb files with your donated textures in the first position. (I actually replaced my recipient's first textures, so the order for mine was Guy.dds, 2.dds, etc. and Guynmap.dds, 2nmap.dds, etc.) EDIT: I used the first position, but apparently the *last* position is more likely to work...?
At this point, you would run the DDSREFEDIT tool and input the number '0' into the 'new texture map' field and '1' into the 'new normal map' fields (assuming your recipient only had a single texture to begin with; this isn't the case with shoto original costumes, though, so count the textures if you need to, according to the instructions in the program; I had to use '5' for the normal map number), your modified *.obj.emo file in the 'Input EMO file' field, and the number of your recipient's replaced model in the EMG # field (in my case, it was '12'). You would then check the box for '+1 to every other normal map references' (this last bit was unnecessary for me because I replaced the duffel bag normal map with the donated normal map).

This was my result:
Anyway, if this last part seems confusing, don't worry about it. I'll be making another tutorial that goes over the texture reassignment tool using a more typical example in the future. In the meantime, try your best, share your work and ALWAYS MAKE BACKUPS.

Friday, August 12, 2011

Test Driving Oneiric Ocelot on ThinkPad X120e

It's that time again. With another Ubuntu release looming on the horizon, I decided to upgrade my netbook to the latest daily build (8/12/11) of Ubuntu 11.10 Oneiric Ocelot, which is still in alpha stage.

Installation

Installation was unchanged from 11.04, so much so, in fact, that it even says "Welcome to Natty Narwhal" :P

As with Natty, installation was quick and easy, with the option to download updates in the background as you go. As before, personalization questions were presented *after* installation had already begun, which saves even more time.

First Impressions

The login screen has changed a bit, and now looks really snazzy, with a stylish dot motif in the background. There's an option to select a Guest Account, along with the option to use the new 2D/non-accelerated Unity desktop, which I believe is powered by the Enlightenment libraries. This 2D desktop supports true transparency, which is nice.

Drivers

The jockey-powered "Additional Drivers" utility automatically found the binary driver for my wireless, which is the nonstandard Broadcom chipset option, so all I had to do is tell it to activate it. CORRECTION: My wireless driver was enabled, but not working. On returning to jockey, the driver was listed as not installed and if I tried to enable it, it would give me the error:
SystemError: E:Unable to correct problems, you have held broken packages.
This suggests that my packages were installed, but somehow got messed up. To fix it, I had to find out which packages for my chipset were installed, by typing:
dpkg -l | grep roadcom
(notice, I searched for 'roadcom,' which will catch packages with both 'broadcom' and 'Broadcom' in the title and/or description. This is important, as the bcmwl-kernel-source package will not show up if you search for 'broadcom' alone.) Then remove them entirely by typing
sudo apt-get purge [package names from the previous command]
Reboot, then try the 'Additional Drivers' utility again. It should successfully enable the driver, then you can reboot again and everything should be working properly.

If you got the standard chipset, it should use the open source driver by default. The default video driver is the Gallium-3D-driven open source driver, but I chose to install the proprietary fglrx driver from AMD via the driver utility.

Audio seems fine and my HDMI audio hardware and output were both recognized from the start. The headphone jack also properly mutes the internal speakers when headphones are plugged in, which is an improvement over my experience with Natty.

Waking from suspend seems fine, too, though hibernation still seems to be a no-go. :(

Applications

The default email client is now Thunderbird, which works well with Firefox, the default browser, and the default music client is now banshee (this may not have been a new change; I can't really remember...).

The built-in search tool for Unity is much improved, with little icons down at the bottom of the window for choosing whether to search everything, just files and folders, just applications, or just search your music collection.

Everything seems to be fine so far, a solid improvement over Natty on these machines. I'll post back if I run into any problems. If you have any questions or experience any problems, post a comment!

Sunday, July 31, 2011

My DIY Backloaded Horn

Over the past 6 months or so, I've been researching and ultimately building a pair of backloaded horns. At the time of this writing, I've only actually finished one of them, but I decided to go ahead and make a post about it.

My Phase Technology Teatro 7.5s sound great, but they're pretty weak on the low-end. I've been supplementing with a shitty powered subwoofer scavenged from a boxed 5.1 surround system, but it just doesn't cut it, unfortunately, so I decided to build some speakers that would cover it a little better.

Since getting my upper-mid horns and hearing their clarity and definition, I wanted to go with another horn for the bass, if possible. I've seen a lot of really crazy, gigantic basshorns on the internet and wanted to avoid the size that would be required to reach below 100 Hz with a compression driver--not to mention the batshit crazy prices that large-scale compression drivers go for on eBay and Audiogon--so I decided to look into backloaded horns.

Ideally, a horn should be as long as the wavelength of the lowest frequency you wish to reproduce, with a mouth of approximately that same diameter, thus bass horns have to be gigantic to reach low frequencies. You can cheat a little, though, by placing the horn against the floor and/or wall of your room, which lets you cut the wavelength requirement by half for each surface, as it uses the walls/floor as if they were a part of the horn. Furthermore, backloaded horns are typically folded horns, which lets them squeeze a lot of length into a relatively small package. Finally, by starting with a large cone driver, your required horn length is reduced further still.

I used this 8" driver for the horns, based on their high sensitivity, though these would also be an excellent alternative. If you don't plan to supplement the horns with a tweeter like I intend to do, you might also consider using a full-range driver, like this one, though it is obviously more expensive. This driver is another good option if you want to play at high volumes, due to its high power handling and *huge* cone excursion.

I came up with my own design for the horn itself, based loosely on some designs I found around online. However, most of the designs I found have the mouth of the horn opening into the wall, which I was afraid would deaden the sound, based on how directive my upper mid horns are. So, I tweaked those designs a bit and ended up with something I could construct out of a single sheet of 4'x8' of wood (MDF [medium-density fiberboard] is the best for speakers, but it's heavy, expensive and rough on your tools; particleboard is a good compromise, IMO, insofar as it is very cheap, but with many of the same characteristics as the more expensive MDF; plywood works, too, but it's ugly).

I used 1/2" particleboard, though TBH, 3/4" would probably have been a better choice, both for rigidity and sound isolation. The sides are 2'x4', the back is 1'x4' and everything else is 1'x2' (i.e., the front, the top/bottom and the interior partitions; the last piece is cut in half and glued together at a right angle). I'm not going to go into much detail about the actual construction, since I'm a shitty carpenter and I'm sure you can find better instructions on box-making online than I could ever provide. Anyway...
Glue the pieces together using wood glue, and don't be afraid to really gob it on. You want it to seep into all of those little nooks and crannies in the wood and form a good seal. You can see the excess squeezing out from under the board in this pic:
To be sure that the junctions are all airtight and won't be leaking air into each adjacent chambers, you can follow behind with silicone caulk or "liquid nails" formulated for wood, which is what I used:
If you look closely, you can also see the right-angle brackets I used to reinforce the box structure.
After all of the interior structure is glued solidly into place, you can glue the other side panel to seal the cabinet shut. I used the liquid nails instead of wood glue to seal it, with a bunch of cinder blocks, books, records, etc. piled on top to get a good connection while the goo dries:
One thing to remember before sealing the cabinet: go ahead and thread some speaker wire through because it'll be much easier now than if you wait. If you do forget (like I did, actually), you can tie the wire around something (I used my dog's Kong toy), drop it into the speaker hole and then flip the whole thing around until it pops out the mouth of the horn. This is harder than it sounds, though, because these horns are gigantic and heavy as shit.

Another bit of advice, do your painting *after* your gluing (unlike me), so you don't have to worry about excess glue spilling over onto your fancy paint job.

Most of the projects I've seen online make a big deal about filling any cavities with sand or kitty litter so they don't turn into resonance chambers, but I don't really notice any problems and I did not do it. Of course, YMMV.

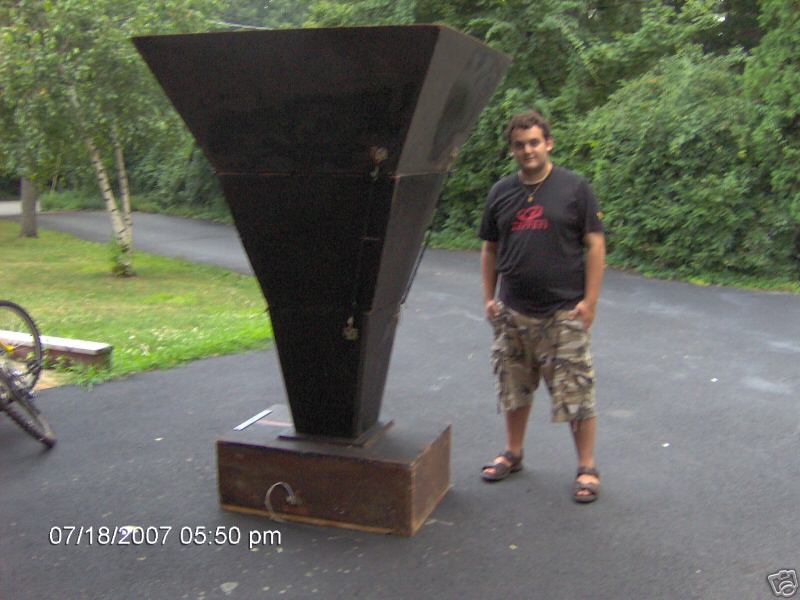
Anyway, here's the finished product:
You can see my small upper mid horn perched on top. You can also see the speaker wire dangling out of the mouth of the horn, since I haven't purchased proper binding posts yet (maybe never...).

As far as the sound, the bass response is considerably more potent than I expected. The driver works as a direct radiator (so better quality drivers will make a noticeable difference in sound quality), while the low frequencies bounce around inside and bellow out of the horn's mouth. The horn produces some of the clearest, most defined bass I've ever encountered, though it is definitely lacking above 1 kHz. That in mind, I intend to pair it with either this tweeter or this one.

One last picture of the finished horn, this time from the side:
The depth is really what makes these guys huge. Special thanks to my wife, who is gracious and long-suffering :-P

Thursday, July 28, 2011

How to Create High-Resolution Textures in SSF4AE - PC

This tutorial covers how to create *.col.emb files from scratch using Kensou's Tools. These files can contain any number or variety of DDS textures of any size/resolution or compression type (DXT*). The most common usage for this is to create textures that are higher resolution than the default textures, but it can be used for other purposes, as well.

Sensibeat's tutorial for making high-resolution textures is much more informative, but requires a level of comfort working with hexadecimal code and calculations. This method is considerably easier but you should still try to understand sensibeat's instructions since the same techniques are helpful in other aspects of modding.

Anyway, lets get started. All you need are piecemontee's Asset Explorer and Kensou's sf4tool.

Step 1. Open a *.col.emb file in the Asset Explorer and extract the DDS textures. Name them something simple that reflects the order they're supposed to come in (I like to use 1.dds, 2.dds, etc.).
Step 2. Open the DDS textures in a paint/editing program, such as Photoshop or GIMP, and scale them to the desired resolution. In this case, I'm scaling a bunch of 512x512 textures up to 1024x1024.
Step 3. Save the textures as new DDS files with any compression you like. This is your opportunity to change, for example, DXT1 textures into DXT5 to allow for semi-tranparency.
Step 4. Now, open the directory for Kensou's sf4tool.exe (NOT sf4toolnew.exe). If you don't have a directory named 'emb' in there, create it now, and then put your enlarged DDS textures into it. Next, run sf4tool.exe by double-clicking it.
Step 5. In the big file-directory pane on the upper-right of the window, double-click on your emb directory and click on the left-hand button underneath the big pane. The smaller pane to the left should populate with your files. Put them in the proper order by changing the filenames in the smaller pane (you can just click in there and type) and then click on the right-hand button to bundle them all together.

Step 6. Back in your 'emb' directory, you should have a new file called 'newpack.emz.' Rename it to match the col file you're trying to create, in my case GKI_01_01.col.emb.

All set! The *.col.emb file you're left with is formatted a little strangely and contains some garbage hex in the index and at the end of the file, but AE doesn't seem to care, so neither do I. :P

You can now use the Asset Explorer to extract/inject textures from your new file using the new textures as a base for mods.

Thursday, July 7, 2011

Sensibeat's cmn File Size Editing Tutorial (Also Applicable to Other emz Bundles)

cmn.emz file size editing tutorial

So now we want to copy some file in our cmn.emz.

We need the Length of the file.
Calculate it or easier, just open the file in the hexadecimal editor, the last offset number is our Length.

I want to "inject" an edited HWK.fce.ema


Last offset is 7BA97 so our Length will be 97 BA 07 00

Note that it's smaller than ZGF.fce.ema but it works the same with bigger files.

Now let's find the ZGF.fce.ema location (search works well too but let's use our new knowledge)
TB = 9C5C28+38 = 9C5C60
The true beginning of the #EMA is at offset 9C5C60
[IMG]

I select the full file


I overwrite it with the HWK.fce.ema file


I insert blanks (00) to make the next #EMA begin at the start of a line (like it was)
[IMG]

Now I know there are 3 files after the one I inserted (Thx to piecemontee's AE) that were moved by my changes.
I need to check the TBs of the #EMA #BAC #BCM + the TBs of the files at the end:

#EMA TB: A41700
A41700 - 40 (CL) = A416C0 (RL)


#BAC TB: A5B6A0
A5B6A0 - 48 (CL) = A5B658 (RL)


#BCM TB: A826B0
A826B0 - 50 (CL) = A82660 (RL)


ZGF.skl.emo TB: A843E0
ZGF.skl.emm TB: A843EC
ZGF.obj.ema TB: A843F8
ZGF.fce.ema TB: A84404
ZGF.cam.ema TB: A84410
ZGF.bac TB: A8441C
ZGF.bcm TB: A84424

We need to enter the Length of the new fce.ema (other lengths didn't change), and new RLs and TBs backwards:


Et voilà.

Sensibeat's Model Swapping Tutorial (Updated)

NOTE: These steps are generally unnecessary now because sloth86's EMGSwap tools have automated the process. However, this tutorial remains a very useful reference and can still be necessary for edge-cases in which sloth86's tools may not work properly. Otherwise, this post will remain for documentation/posterity.

Updated Version:

Swapping objects (SSF4AE)
 I'll swap cammy's first costume hat with the 2nd one.

In sf4explorer I open CMY_02.obj.emo and I "raw dump" (not "extract") the #EMG (cap_lether) (cap_line)

(I name it CMY_02.cap.emg)


I open CMY_01.obj.emo and CMY_02.cap.emg in HxD

In CMY_01.obj.emo I search for the #EMG (F3) containing the "cap"

(note the offset: 670C0)

I go to the next #EMG (F3)


I place the cursor just before that #EMG and I use the "select block" fonction (CTRL+E) using the start offset I noted (670C0):


OK:


(Note the Length: 63F0)

The #EMG selected in CMY_01.obj.emo, I now "Select All" (CTRL+A) CMY_02.cap.emg and I copy it (CTRL+C).


(Note the Length: 50C0)

I paste it (CTRL+V) over the #EMG selected in CMY_01.obj.emo


OK:


Let's do some math in hexadecimal:
Code:
63F0 (Length of former #EMG) - 50C0 (Length of new #EMG) = 1330
1) I need to substract 1330 in the index at the start of the file for every offset of the #EMGs for every object coming after the "cap", as the new object is smaller than the old one.


By opening CMY_01.obj.emo in sf4explorer, I can count that the cap is the 10th #EMG so I have to substract 1330 from the 11th #EMG to the last one (22th #EMG).


The index of the #EMGs starts at offset 28
From there each block of 8 digits is the offset of one #EMGs minus 30 written backwards 2 digits at a time ("little endian"):
01 23 45 69 in little endian will be 69 45 23 01 in big endian

So I'll have to edit the 12 index entries from offset 50 (#EMG 11) to 7F (#EMG 22)
I substract 1330 to the offsets (calculating in hexadecimal and reading offsets in "big endian"):
Code:
00 06 D4 80 - 1330 = 00 06 C1 50  00 06 E4 50 - 1330 = 00 06 D1 20  ...  00 0A F1 60 - 1330 = 00 0A DE 30  
And I rewrite them backwards ("little endian")


2) I need to substract 1330 to 2 more offsets related to the 2nd part of the obj.emo file:

Code:
00 0C A7 00 - 1330 = 00 0C 93 D0  00 0C A5 90 - 1330 = 00 0C 92 60  


Let's go to the 2nd offset (minus 20 written backwards, so 00 0C 92 60 + 20 = 00 0C 92 80), using the goto fonction (CTRL+G):


Here's another index I need to substract 1330 to:


From offset C9280 to C92D7, just before the first readable datas (hand_env):

Code:
00 0C A5 E8 - 1330 = 00 0C 92 B8  ...  00 0C A6 D1 - 1330 = 00 0C 93 A1  


Save and that's it for the 1st part:


Next I'll show how to add dds to the col.emb and nml.emb files and how to link objects in the obj.emo file to the right dds.

1) Adding dds to the col.emb (and nml.emb) files

In sf4explorer, I extract the dds for the cap from CMY_02_01.col.emb
That I name CMY_02_01.dds:


I open CMY_01.col.emb and CMY_02_01.dds in HXD


In CMY_01.col.emb, I add a line of "00" at the end of the index, here:


I change this "04" at offset 0C (former number of dds):


Into "05" (new number of dds):


And I edit the index because I moved all the offsets by 10 with my line of "00":


I add another line of "00" at the end of the file, here:


(Note the starting offset of the new dds will be: 155850)

I "select All" (CTRL+A) CMY_02_01.dds and copy it


(Note the Length: 555F0)

I paste it at the end of the file (after the line of "00"):


Then I go back to the start of the file to enter the starting offset of the new dds minus 40 writen in "little endian"
(40 = offset where I'll write the new index entry)
00 15 58 50 - 40 = 00 15 58 10 ("big endian")
That gives in "little endian":


Now I add the new dds length written in "little endian" (00 05 55 F0):


Save and do the exact same thing with the normal map dds in CMY_01.nml.emb, adding the normal map dds that contains the cap from CMY_02.nml.emb

2) Linking objects in the obj.emo file to the right dds

dds are ordered from 0 and the normal map dds follow the texture dds, so if you add 1 texture dds, every normal map dds will change number.
I have now 5 texture dds from #0 to #4
and 5 normal map dds from #5 to #9

I open CMY_01.obj.emo in HxD and do a search on "#EMG" (F3)
Each #EMG has those kind of data outlined here:


They contain the links to the dds:


The numbers in red are links to the texture dds
The numbers in green are links to the normal map dds

I have to change all the links to the normal map dds for the 22 #EMG according to the new order of the dds
(I just have to add 1 to every normal map link as we added 1 texture dds)


And edit the "cap" #EMG to link it to my 2 new dds #4 and #9:


Save and it's over.


Original Version:

Let's put Ryu's hairs on Akuma's (a.k.a. Gouki).

preparation:

From GKI_02.obj.emo I dump and rename (included in swap obj.rar):
  • GKI_01.bsr

  • GKI_01.nml.emb

  • GKI_01.shd.emo
They'll be used in kensou's sf4tool to repack the file.

From RYU_03.cos.emz I dump the hair emg file that I rename as RYU_03.hair.emg (included in swap obj.rar):


Open GKI_02.obj.emo and RYU_03.hair.emg in HxD:
The hair being the last emg of GKI file, we can get the information on it's beginning and ending from these:


Code:
offset 24 = offset of the list of offsets of names following the last emg:
00 0B A2 70 + 20 = 00 0B A2 90 so the emg finishes at 00 0B A2 8F (1 before)
offset 58 = 1st offset of last emg (hair):  00 0A 68 D0 + 30 = 00 0A 69 00

Let's use the "Select block" option in HxD:


Now select all of the RYU file and copy/paste it over GKY's selection:


OK:

Notice the 2 offsets that will need to be rewritten at the beginning of the file:

Code:
00 0C 01 70  -20 = 00 0C 01 50  -> backwards: 50 01 0C 00 @ offset 24
00 0C 02 20 -> backwards: 20 02 0C 00 @ offset 10

Then the 2 offsets at the beginning of the file:


So it's good for the emo's references.


Now let's take a look at the emg's references:

43 -> former emg is 42
01 -> number of the 2nd texture dds
05 -> number of the 2nd normal map dds

Save and Rename the file as GKI_01.obj.emo

Put it in a new folder with:

  • GKI_01.bsr

  • GKI_01.nml.emb

  • GKI_01.shd.emo
and only those 4 files.

Open kensou's sf4tool and go look for your file path in the upper right, then click the left button under the big window:


Notice the files obj.emo and shd.emo are swapped.
Rewrite them in the right order (obj before shd) and click the right button:


Done.

Rename the newpack.emz into GKI_01.cos.emz and test it ingame with the GKI_01_01.col.emz provided (2nd costume 1st color file edited to be played as 1st costume):


You've got Akuma with Ryu's hairs.

For swapping smaller objects:

Basically you just have to copy/paste your emg and fill the rest of the former emg with 00's. Then there're just the emg number and the dds references to change. So the swap can be done on the .cos.emz directly.

Analytics Tracking Footer