Showing posts with label bsnes. Show all posts
Showing posts with label bsnes. Show all posts
Monday, June 13, 2016
Higan Special Chip Images
Higan's bsnes emulator uses low-level emulation (LLE) for the special chips found in some SNES games. Cait Sith's hardware page has dumps of these chips but it can be hard to find the split program/data versions needed for Higan, so here they are.

Thursday, June 25, 2015
Latency Testing
My student worker, Alex, borrowed a digital oscilloscope and photoresistor from a coworker of mine and we sat down at my workstation to collect some data in an area that's often discussed (vociferously!) but rarely actually tested: latency. Most latency testing is unscientific voodoo ("I can *feel* it") that also suffers from confused terminology (see: the fighting game community's complaints about "lag" and how it makes them drop their combos). In this case, we're specifically examining input latency; that is, the difference in time between pressing a button on the controller and the action taking effect on the screen.
Here's a picture of our test bench, which consisted of a button from my trusty Happ-modded Mad Catz SE wired into the aforementioned oscilloscope:
 The input from the button is compared against the voltage running through the photoresistor attached to a battery (and a momentary switch to keep the resistor from just draining the battery):
 The photoresistor gets placed against my computer monitor while the button is used to make things happen in the emulators. As the brightness changes underneath the photoresistor, the resistance also changes changes, and the oscilloscope displays the difference in time between the voltage drop in the button and the change in voltage from the resistor/battery circuit, which looks something like this:
 We only had the equipment for a day, so I couldn't test as much as I would have liked, but I tried to be as consistent as possible. To that end, we sampled 5 data points for each variable and did all of the testing on the same machine. All SNES comparisons used the Super Famicom Controller Test ROM, while the arcade comparisons used Espgaluda from Cave (in hindsight, probably not the best choice, but it's what I had on-hand). I also didn't have a good way of getting a baseline latency--I'm using a modern, crappy Dell LCD setup rather than a CRT and Windows 7 64-bit, which I chose out of both convenience and the assumption that it would be similar to a typical user's setup--so I was forced to provide data for *total system latency* rather than being able to isolate the latency caused by the individual variables. In attempting to get some sort of baseline, we held up the tester to the built-in gamepad testing applet in Windows, which gave results hovering around 75 ms, which is obviously not accurate, since some of our emulators performed better than that... With that in mind, these results should only be considered relative and not absolute.
Note: my full system info is Intel i7 Sandy Bridge with AMD R7 200 series with all of the GPU control panel crap turned off except for Eyefinity.
Anyway, here are the graphs that illustrate some of the more interesting comparisons:
 First off, Aero compositing is bad news for both latency and variance. The increased variance is a real kick in the pants because it makes your performance less predictable. If you want consistent behavior and generally improved latency, stick with a "classic" non-Aero theme. Interestingly, disabling Aero did not seem to help with Higan.
 Overall, this graph shows us that exclusive fullscreen is significantly better than windowed for latency, which is expected based on our Aero compositing findings. You'll notice there's no benefit to fullscreen in Higan (it's worse, in fact) because it's not *exclusive* fullscreen. Instead, it's what's known as "windowed" or "borderless" fullscreen. You can also see that ZSNES in exclusive fullscreen is extremely fast; faster than my supposed baseline of 75 ms :O
 Higan had the highest latency figures here, even after correcting for the shaders--which I'll talk about more in a sec--with RetroArch about a frame lower (this includes data from both the snes9x and bsnes-compatible cores, which were not significantly different [87 ms vs 92 ms, which is within the variance of USB polling rates]). This also combines both windowed and fullscreen, which hurt ZSNES and ZMZ, the clear winners in exclusive fullscreen mode from our previous graph. Note: when ZSNES and ZMZ went into exclusive fullscreen, they broke Eyefinity, which other testing suggested adds up to ~8ms (or a half-frame) of latency, so keep that in mind when looking at their results.
 This one was a dagger in my heart, but I'm posting it here anyway because of SCIENCE. I had always assumed that shaders would never increase latency because, in a worst-case scenario, they would just reduce the framerate (i.e., if the shader takes >16 ms to render). This is obviously not the case, as cgwg's crt-geom increases latency considerably in both Higan and RetroArch, as does crt-lottes. Crt-hyllian, on the other hand, has almost no effect on latency. To explore whether it's just heavy-duty math that causes the latency and whether it's exacerbated by multiple shader passes, I also tested Hyllian's xBR-lvl4-multipass in RetroArch. Shockingly, this one produced lower latency than no shader at all, which I find highly dubious.
 I kept this one in here because there's been a contentious debate as to which of these platforms provides the best experience for emulating arcade games. However, there are some serious caveats to keep in mind before drawing too strong of a conclusion: 1.) this used a different test ROM from the SNES emus, 2.) the test ROM I used was selected out of convenience and actually had a lot of potentially confounding noise in the form of enemy bullets passing through my test area, 3.) GroovyMAME and RetroArch are really at their best running in KMS via Linux rather than Win64, so they would likely have more pronounced benefits vs mainline MAME if I could have measured that, and 4.) in initial testing the day before I ran these measurements, mainline MAME performed incredibly badly, with GroovyMAME close behind, which suggests that there may be some other variance involved.
That all said, these data indicate that RetroArch is approximately 1.5 frames slower than GroovyMAME, while the difference between mainline MAME and GroovyMAME is within the variance of USB polling rates. However, in light of the counfounders, I think the strongest conclusion we can draw reliably from the arcade comparison is that RetroArch isn't any *better* in Win64 (i.e., a null finding), so users should go with whichever platform has the features that best suit their needs rather than worrying about slim-to-nonexistent latency differences.
Conclusions
While the testing was not 100% reliable due to multiple confounders in several areas, we can see some trends emerge that can inform our discussions about latency in emulation. Windowed is definitely worse than fullscreen, and enabling Aero compositing is worse than without while also increasing variance and unpredictability. Shaders can actually cause excess latency, sometimes severely so. ZSNES, which has become a bit of a punching bag among SNES emulation scenesters, has outrageously low latency in fullscreen, so if you can stomach the terrible accuracy, there's actually some justification for using it now other than OMGSNOW!1! Alcaro's ZMZ also performed very well and can utilize more accurate emulation cores, so it can be a means to leverage some of ZSNES' latency benefits without being stuck with its poor accuracy.
In the future, I would like repeat these tests with a CRT monitor, which would have a predictable baseline of near 0 ms. I would also like to test latency in other environments, namely Linux+KMS. Finally, it would be very useful to have some comparative figures for original SNES hardware (both via CRT and upscaled via XRGB-Mini) and for RetroArch running via console.
Here is a link to download the raw data in Excel format, in case anyone would like to look at the numbers in more detail and/or perform other comparisons that I didn't think of.
EDIT: I think some people are drawing more conclusions from these data than is really appropriate; specifically, some folks are trying to draw direct comparison between the emulators/frontends tested. These data are simply not extensive enough for that. Furthermore, it's important to keep in mind that I didn't test the quality of sync, which could heavily affect the results. Namely, ZSNES and ZMZ both suffer from frequent audio crackling and frame stutters, which indicate issues with vsync, while RetroArch has none of either. I didn't test RA with vsync disabled (i.e., blocking on audio with video tearing), which could have an effect, and in general gameplay, users need to decide whether improvements in sync are worth minor (potential) increases in relative latency.
Here's a picture of our test bench, which consisted of a button from my trusty Happ-modded Mad Catz SE wired into the aforementioned oscilloscope:


Note: my full system info is Intel i7 Sandy Bridge with AMD R7 200 series with all of the GPU control panel crap turned off except for Eyefinity.
Anyway, here are the graphs that illustrate some of the more interesting comparisons:


That all said, these data indicate that RetroArch is approximately 1.5 frames slower than GroovyMAME, while the difference between mainline MAME and GroovyMAME is within the variance of USB polling rates. However, in light of the counfounders, I think the strongest conclusion we can draw reliably from the arcade comparison is that RetroArch isn't any *better* in Win64 (i.e., a null finding), so users should go with whichever platform has the features that best suit their needs rather than worrying about slim-to-nonexistent latency differences.
Conclusions
While the testing was not 100% reliable due to multiple confounders in several areas, we can see some trends emerge that can inform our discussions about latency in emulation. Windowed is definitely worse than fullscreen, and enabling Aero compositing is worse than without while also increasing variance and unpredictability. Shaders can actually cause excess latency, sometimes severely so. ZSNES, which has become a bit of a punching bag among SNES emulation scenesters, has outrageously low latency in fullscreen, so if you can stomach the terrible accuracy, there's actually some justification for using it now other than OMGSNOW!1! Alcaro's ZMZ also performed very well and can utilize more accurate emulation cores, so it can be a means to leverage some of ZSNES' latency benefits without being stuck with its poor accuracy.
In the future, I would like repeat these tests with a CRT monitor, which would have a predictable baseline of near 0 ms. I would also like to test latency in other environments, namely Linux+KMS. Finally, it would be very useful to have some comparative figures for original SNES hardware (both via CRT and upscaled via XRGB-Mini) and for RetroArch running via console.
Here is a link to download the raw data in Excel format, in case anyone would like to look at the numbers in more detail and/or perform other comparisons that I didn't think of.
EDIT: I think some people are drawing more conclusions from these data than is really appropriate; specifically, some folks are trying to draw direct comparison between the emulators/frontends tested. These data are simply not extensive enough for that. Furthermore, it's important to keep in mind that I didn't test the quality of sync, which could heavily affect the results. Namely, ZSNES and ZMZ both suffer from frequent audio crackling and frame stutters, which indicate issues with vsync, while RetroArch has none of either. I didn't test RA with vsync disabled (i.e., blocking on audio with video tearing), which could have an effect, and in general gameplay, users need to decide whether improvements in sync are worth minor (potential) increases in relative latency.
Saturday, April 26, 2014
Cx4 SNES Special Chip Image Download
Since byuu added low-level emulation support for the various special chips found in SNES games into bsnes/higan, anyone wanting to play those games has needed an image of the chips to go along with their ROMs. Most of the common SNES special chip images are available from caitsith2's SNES hardware page, except for the Cx4 image used in Mega Man X 2 and 3. Byuu is confident that the contents of the Cx4 image are non-copyrightable (it's just math tables) and hosted a copy of it on his own site for some time but that seems to be either down or missing since his various website overhauls, so I figured I'd host it here, from my mediafire account:
http://www.mediafire.com/download/9747o707ciq4lh8/cx4.rom
Wednesday, November 6, 2013
Quark Shaders for Higan/bsnes v093+
As of v093, Higan (previously known as bsnes) includes a new shader format based on OpenGL 3.3 / GLSL 1.5. This format is nice, powerful and roughly as flexible as RetroArch's Cg support. Hyllian, aliaspider and I set to work converting many of the most popular shaders to the new format, available from the Quark Shader Github repo.
If you're not familiar with git, you can download the full repo by clicking on the 'Download ZIP' button in the right-hand margin.
To use these shaders, place the entire *.shader directory into your Video Shaders directory. One caveat: the handful of shaders that utilize motion blur won't work with v093, but should be functional with v094+.
If you're not familiar with git, you can download the full repo by clicking on the 'Download ZIP' button in the right-hand margin.
To use these shaders, place the entire *.shader directory into your Video Shaders directory. One caveat: the handful of shaders that utilize motion blur won't work with v093, but should be functional with v094+.
Saturday, July 28, 2012
Customizing cgwg's CRT Pixel Shader
This document identifies some of the user-configurable options available in cgwg's GLSL CRT shader and provides some screenshots to explain their effects.
For individuals interested in recapturing the look of retro gaming consoles played on a CRT television like the ones we grew up with, cgwg's CRT shader provides the closest approximation available for modern LCD displays. The pixel shader is purely cosmetic--nothing could impart the technical advantages of a CRT, such as negligible input lag and insanely high contrast, to an LCD--but it can go a long way to displaying old games as we remember them. Since memory and nostalgia are important to the way we perceive these games, each person will have different feelings about what looks "right" to them.
We will be using the latest (as of the time of this writing, 7/28/12) and most complete version of the shader, known as CRT-Geom. This shader allows for simulated screen curvature, rounded corners, simulation of a back-tilted screen (for arcade emulation) and many other goodies. All images are captured at 4x scale, click the thumbnails to embiggen.
This is what the shader looks like with all default parameters, also known as the 'curved' variant (cgwg chose sane values for all of the variables by default):
 The user-configurable parameters are primarily located in two places in the shader, starting at line 87 for the first section and line 135 for the second section. You should be able to open and edit the shader in any text editor, but I recommend Notepad++.
The first parameters, 'gamma of simulated CRT' and 'gamma of display monitor' allow the shader to determine how much gamma correction to apply to the image. CRT displays generally had higher gamma ratings than most LCD displays (2.4 for a typical CRT vs 2.2 for a typical LCD), so the shader adds 0.2 to the gamma to compensate. If you calibrate your LCD to a higher or lower gamma setting, you may wish to change the 'gamma of display monitor' to reflect your individual settings. You can also raise or lower the simulated gamma to make a darker, more saturated look:
 or a lighter, desaturated look:
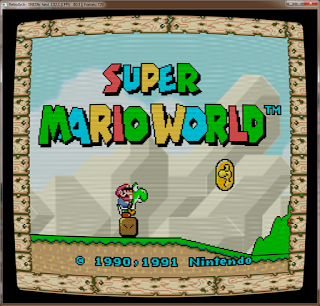
Next, we have 'overscan.' Each CRT showed a slightly different amount of the picture, and the cut-off portion was referred to as overscan. You can modify the amount of over- or underscan by changing this variable. Setting it to (0.00,0.00) will assume you want the picture aligned exactly with the borders of the window. Setting it to a value greater than 1.0 (for example, 1.10,1.10) will cut off a large portion of the screen (approximately 10% in this example):
 while setting it to a value less than 1.0 will surround the screen with black bars (i.e., underscan):
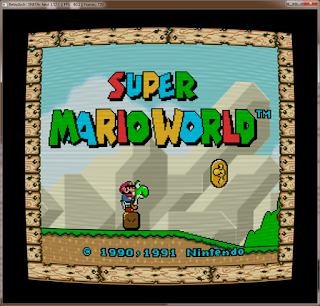
Increasing the overscan slightly, say, to 1.02,1.02, can cut off unsightly garbage lines at the top of the screen, which is common on NES games.
Next, we have 'aspect ratio,' which controls how much our screen curvature settings will affect the top/bottom and sides of the image. The default setting of 1.0, 0.75 means the curvature will be more pronounced on the top/bottom than on the sides, to compensate for the standard 4:3 aspect ratio. Setting it to 1.0, 1.0 will make the settings affect both sides of the screen equally, which isn't quite right in that the top/bottom actually appears more curved than the sides:
 If for some reason you want only the sides straight, you can set it to 1.0, 0.5:
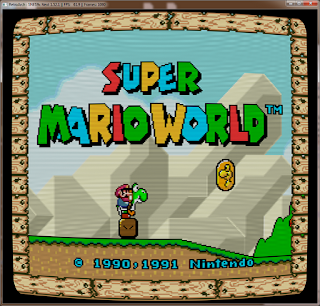
or 0.5, 1.0 to make only the top/bottom straight:
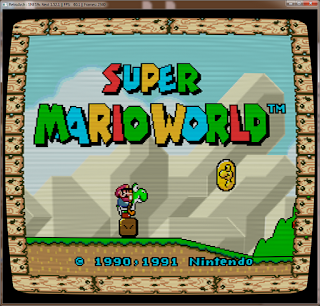
Next up, we have 'simulated distance from viewer to monitor.' Similar to the 'aspect ratio' setting, this exaggerates the effect of the 'tilt angle' setting that we'll be covering in just a moment. The default value of 2.0 is reasonable. Increasing the value reduces the effect of the tilt angle:
 while lower values magnify it:
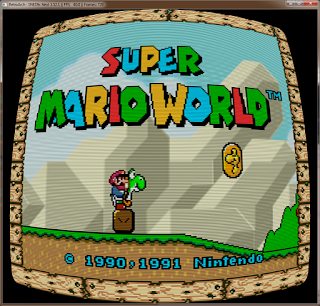
Next, we have 'radius of curvature,' which determines how curved our simulated TV tube will be. Setting the value to 2.0 reduces the curvature to something more like what I remember.

'Tilt angle' pincushions one side of the screen. To tilt the screen back, use a negative value for the second number. The default for the 'arcade tilt' variant, (0.0,-0.15), is a sane value:
 while increasing the second value tilts it back further, which can be disorienting:
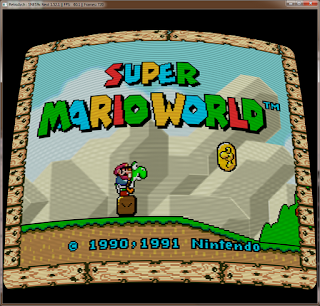
After that, we come to 'cornersize,' which determines the radius of the corner arc. I think a setting of 0.03, as used in the default image, looks appropriate. Increasing the value to 0.10 makes for some silly, super-round corners:
 while a value of 0.001 makes for super-pointy corners:
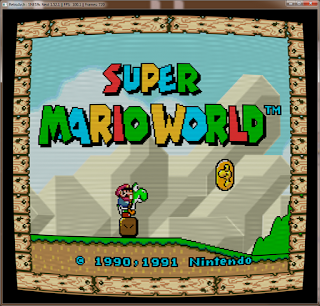
For the last parameter in this section, we have 'cornersmooth,' which determines how sharp (sharp as in sharp/blur, not as in pointy) the corners look. The default value is 1000.0, which looks fine, but I noticed that if you set the value insanely low (i.e., 80), you get a little vignetting around the edges, which reminds me of my crummy old TVs:
 On to the next set of parameters.
The second set of options are either enabled or disabled by using 'comments,' which in this case are represented as a double-slash, like this //.
The first option is 'linear processing,' which calculates the interpolation in linear gamma:
 The effect is subtle (black outlines will be thinner), but disabling it via commenting it out (//#define LINEAR_PROCESSING) can improve the framerate with some video cards.
Next, we have 'Enable screen curvature.' Pretty self-explanatory, but if you comment this line out, you'll get straight top/bottom/sides of the screen, but with the corner arcs intact (barely visible in this shot):


The next two options work together (that is, if you uncomment one, you should comment the other). By default, the shader uses 3x oversampling of the beam profile, which makes brighter pixels bleed further into the surrounding scanlines. Here it is with the default oversampling, scaled up 400% (look closely; it's most obvious on the bright red of Mario's sleeve):
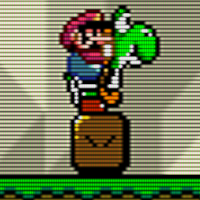
and here it is with the gaussian beam profile:



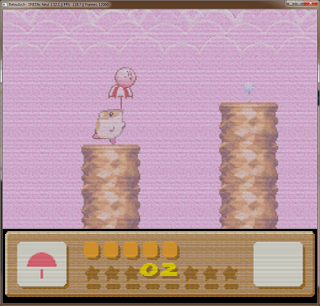
This blurring is accomplished by adding another pass to the shader that does nothing but squish the horizontal resolution from 512 to 256. Note: this variant is multipass and therefore incompatible with the official bsnes/higan GUI. Retroarch can use it just fine with bsnes-derived emulation cores, but it is incompatible with FBO/2-pass shader stacking.
Finally, to simulate the natural phosphor glow of a CRT display, cgwg created a multipass version of his CRT shader that includes a "halation" pass, which provides a soft blur that is most noticeable against a black background, such as the Nintendo logo screen in Super Mario World (it also seems to be doing some aspect ratio correction, though I'm unsure if that's intentional):

 Here's a shot of Super Metroid's title screen without and with halation, respectively:

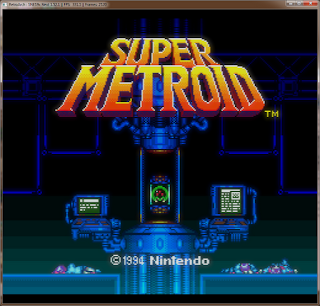
Note: Like the TV blur variant, this halation variant is multipass and thus incompatible with the official bsnes/higan GUI. It works fine with Retroarch but is incompatible with the FBO/2-pass feature.
Now, beyond the CRT display, our childhood gaming experiences were also colored by limitations of the NTSC signal standard and the lossy, analog hookups we used to connect our consoles. To capture these effects, we turn to blargg's NTSC filter, which runs on the CPU rather than the GPU and can thus be combined with our CRT shader.
The NTSC filter is available in these CPU filter packs (compatible with RetroArch but not bsnes/higan):
Win32
Win64
Linux 32-bit
Linux 64-bit
Mac OS X
The least intrusive variant of the filter is the RGB preset, which simulates a high-quality RGB connection. This variant provides NTSC color gamut correction but leaves the signal otherwise untouched:
 Next, we have the S-video variant, which has color correction and some fringing, but is still relatively high-quality. This is the variant I use most of the time:
 The third variant, composite, brings in a lot of signal noise and color bleed, just as you would get through a composite, RCA-cable connection:
 The worst-quality variant is RF, which looks just as messy as the composite signal, but with added jutter every other frame, just like when using the RF adapter bundled with classic consoles:
 One thing to be aware of, though, when using any variant of the NTSC filter is that it also does some gamma correction, which can be overwhelming to some people when combined with the CRT shader. To mitigate this effect, you can modify the CRT shader's 'gamma of simulated CRT' to match the 'gamma of display monitor' value to disable the shader's own gamma correction (shown here with the S-video variant):

For individuals interested in recapturing the look of retro gaming consoles played on a CRT television like the ones we grew up with, cgwg's CRT shader provides the closest approximation available for modern LCD displays. The pixel shader is purely cosmetic--nothing could impart the technical advantages of a CRT, such as negligible input lag and insanely high contrast, to an LCD--but it can go a long way to displaying old games as we remember them. Since memory and nostalgia are important to the way we perceive these games, each person will have different feelings about what looks "right" to them.
We will be using the latest (as of the time of this writing, 7/28/12) and most complete version of the shader, known as CRT-Geom. This shader allows for simulated screen curvature, rounded corners, simulation of a back-tilted screen (for arcade emulation) and many other goodies. All images are captured at 4x scale, click the thumbnails to embiggen.
This is what the shader looks like with all default parameters, also known as the 'curved' variant (cgwg chose sane values for all of the variables by default):

The first parameters, 'gamma of simulated CRT' and 'gamma of display monitor' allow the shader to determine how much gamma correction to apply to the image. CRT displays generally had higher gamma ratings than most LCD displays (2.4 for a typical CRT vs 2.2 for a typical LCD), so the shader adds 0.2 to the gamma to compensate. If you calibrate your LCD to a higher or lower gamma setting, you may wish to change the 'gamma of display monitor' to reflect your individual settings. You can also raise or lower the simulated gamma to make a darker, more saturated look:


Next, we have 'overscan.' Each CRT showed a slightly different amount of the picture, and the cut-off portion was referred to as overscan. You can modify the amount of over- or underscan by changing this variable. Setting it to (0.00,0.00) will assume you want the picture aligned exactly with the borders of the window. Setting it to a value greater than 1.0 (for example, 1.10,1.10) will cut off a large portion of the screen (approximately 10% in this example):


Increasing the overscan slightly, say, to 1.02,1.02, can cut off unsightly garbage lines at the top of the screen, which is common on NES games.
Next, we have 'aspect ratio,' which controls how much our screen curvature settings will affect the top/bottom and sides of the image. The default setting of 1.0, 0.75 means the curvature will be more pronounced on the top/bottom than on the sides, to compensate for the standard 4:3 aspect ratio. Setting it to 1.0, 1.0 will make the settings affect both sides of the screen equally, which isn't quite right in that the top/bottom actually appears more curved than the sides:


or 0.5, 1.0 to make only the top/bottom straight:

Next up, we have 'simulated distance from viewer to monitor.' Similar to the 'aspect ratio' setting, this exaggerates the effect of the 'tilt angle' setting that we'll be covering in just a moment. The default value of 2.0 is reasonable. Increasing the value reduces the effect of the tilt angle:


Next, we have 'radius of curvature,' which determines how curved our simulated TV tube will be. Setting the value to 2.0 reduces the curvature to something more like what I remember.

'Tilt angle' pincushions one side of the screen. To tilt the screen back, use a negative value for the second number. The default for the 'arcade tilt' variant, (0.0,-0.15), is a sane value:


After that, we come to 'cornersize,' which determines the radius of the corner arc. I think a setting of 0.03, as used in the default image, looks appropriate. Increasing the value to 0.10 makes for some silly, super-round corners:


For the last parameter in this section, we have 'cornersmooth,' which determines how sharp (sharp as in sharp/blur, not as in pointy) the corners look. The default value is 1000.0, which looks fine, but I noticed that if you set the value insanely low (i.e., 80), you get a little vignetting around the edges, which reminds me of my crummy old TVs:

The second set of options are either enabled or disabled by using 'comments,' which in this case are represented as a double-slash, like this //.
The first option is 'linear processing,' which calculates the interpolation in linear gamma:

Next, we have 'Enable screen curvature.' Pretty self-explanatory, but if you comment this line out, you'll get straight top/bottom/sides of the screen, but with the corner arcs intact (barely visible in this shot):

By commenting this out and setting 'cornersize' to 0.0, you get an idealized flat CRT tube, which is represented by the 'CRT-flat' shader variant:

The next two options work together (that is, if you uncomment one, you should comment the other). By default, the shader uses 3x oversampling of the beam profile, which makes brighter pixels bleed further into the surrounding scanlines. Here it is with the default oversampling, scaled up 400% (look closely; it's most obvious on the bright red of Mario's sleeve):

and here it is with the gaussian beam profile:

The gaussian beam profile may have better performance on some video cards.
Those are all of the options available for the standard CRT shader, but there are a few more things we can add in. The first of which is support for interlaced video. Some games did a sort of fake doubling of their vertical resolution by showing different lines of a progressive signal on alternating frames in a process known as interlacing. If handled incorrectly, you will see a ton of combing artifacts (weird horizontal lines on moving objects), as well as distorted scanlines (first image taken using this older, non-interlace-supported version):


These pictures unfortunately cannot show the jutter in the lower image that occurs from showing different lines on each alternating frame.
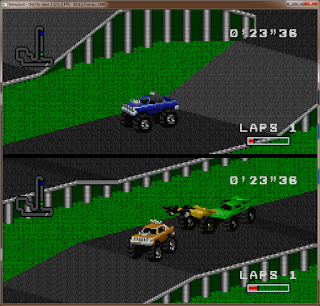
Next, we have support for pseudo-hires transparency--whereby games created a fake transparency effect by doubling the horizontal resolution to 512 and then covering the transparent area with thin vertical lines, which were then squished together and blurred when the CRT displayed the image--in the games that utilize it, including Jurassic Park and Kirby's Dreamland 3:


This blurring is accomplished by adding another pass to the shader that does nothing but squish the horizontal resolution from 512 to 256. Note: this variant is multipass and therefore incompatible with the official bsnes/higan GUI. Retroarch can use it just fine with bsnes-derived emulation cores, but it is incompatible with FBO/2-pass shader stacking.
Finally, to simulate the natural phosphor glow of a CRT display, cgwg created a multipass version of his CRT shader that includes a "halation" pass, which provides a soft blur that is most noticeable against a black background, such as the Nintendo logo screen in Super Mario World (it also seems to be doing some aspect ratio correction, though I'm unsure if that's intentional):


Note: Like the TV blur variant, this halation variant is multipass and thus incompatible with the official bsnes/higan GUI. It works fine with Retroarch but is incompatible with the FBO/2-pass feature.
Now, beyond the CRT display, our childhood gaming experiences were also colored by limitations of the NTSC signal standard and the lossy, analog hookups we used to connect our consoles. To capture these effects, we turn to blargg's NTSC filter, which runs on the CPU rather than the GPU and can thus be combined with our CRT shader.
The NTSC filter is available in these CPU filter packs (compatible with RetroArch but not bsnes/higan):
Win32
Win64
Linux 32-bit
Linux 64-bit
Mac OS X
The least intrusive variant of the filter is the RGB preset, which simulates a high-quality RGB connection. This variant provides NTSC color gamut correction but leaves the signal otherwise untouched:


My personal preferences, depending on the game/system: 'radius of curvature' of 2.0, cornersize of 0.03, cornersmooth of 80.0 and NTSC-Svideo. Sometimes I'll use the flat variant (especially on displays that have problems with moire patterns caused by curvature+scanlines), and I often use the halation variant when I'm on a machine with sufficient resources. I always use interlacing support, which has been incorporated into all of the latest versions, and TV blur when possible (i.e., when using Retroarch rather than the official bsnes/higan GUI).
Thursday, March 3, 2011
Themaister's Waterpaint and Scanline Pixel Shaders for SNES
Themaister, author of the excellent libsnes interface SSNES, has been working on some really fantastic GLSL pixel shaders for use with compatible emulators, such as bsnes and SNES9x.


First, we'll take a look at the waterpaint shader, which has an effect similar to smoothing filters, such as SuperSaI, but with a little extra fattening that gives it the appearance of a watercolor painting:

This looks great already, but text can sometimes get a bit hard to read and some details get flattened out, so he also made a version that includes light scanlines (both the standard horizontal scanlines, as well as faint vertical lines, as would be found in a phospher mask):

I think this version does a better job of maintaining fine details and really looks nice, especially on Zelda:LttP.
Next, he produced a beautiful (and easily customizable) resolution-agnostic scanline shader. In contrast with my own scanline shaders, Themaister's shader will work with any scale factor instead of having one hardcoded in. Here's how his default version looks without and with bilinear filtering (smooth video), respectively:


In addition to this default, I modified the settings to create medium and dark scanline settings, as well (each shown without and with bilinear filtering enabled, respectively):


You can download these shader's from my mediafire account. If you would like to modify the scaline shaders yourself, you can play around with these figures:
const float base_brightness = 0.95;const vec2 sine_comp = vec2(0.05, 0.15);
Subscribe to:
Posts (Atom)