Showing posts with label emulation. Show all posts

Sunday, March 5, 2017

Raspberry Pi 240p Composite Output

Big news for emulation on Raspberry Pis of any generation: a new firmware update has enabled 240p output through the composite video-out port (a dedicated port on older models and a combo 3.5 mm jack on newer models).

From Raspbian and its derivatives, you can run from a terminal:
sudo rpi-update
and it will automatically install the new firmware. For Lakka, the updated firmware will make its way into the main release at some point, but in the meantime, you'll need to mount your SD/microSD card on another machine and then find the 'boot' directory (for Lakka, this will be located in the ~500 MB partition that holds the system files rather than the bigger partition that holds your games) and make a backup in case anything goes wrong (not likely, but better safe than sorry).

Next, you'll need to download the new firmware files from github (here's a direct link to a zipped download) and copy them into the boot directory, overwriting what's already there. I believe you only really need a subset of the files (bootcode.bin, fixup.dat, fixup_cd.dat, fixup_db.dat, fixup_x.dat, start.elf, start_cd.elf, start_db.elf and start_x.elf), so if it acts strangely, maybe try cutting down to just those files.

In your config.txt, you can use the sdtv_mode directive to change to the new modes (either NTSC or PAL):
sdtv_mode=16    # progressive NTSC
sdtv_mode=0x10  # progressive NTSC (using hex notation)
sdtv_mode=18    # progressive PAL
sdtv_mode=0x12  # progressive PAL (using hex notation)
Also, make sure your config.txt isn't forcing HDMI output via hdmi_force_hotplug=1 (comment it out, if so) and you might want to force composite output, just to be sure, by adding hdmi_ignore_hotplug=1.

Raspbian and derivatives can now also change modes at runtime using the tvservice program:
$ tvservice -c "NTSC 4:3" ; fbset -depth 8 ; fbset -depth 32; tvservice -s 
Powering on SDTV with explicit settings (mode:0 aspect1)state 0x40001 [NTSC 4:3], 720x480 @ 60.00Hz, interlaced
for interlaced mode or:
$ tvservice -c "NTSC 4:3 P" ; fbset -depth 8 ; fbset -depth 32; tvservice -s 
Powering on SDTV with explicit settings (mode: 16 aspect:1)state 0x40001 [NTSC 4:3], 720x480 $ 60.00Hz, progressive
for 240-line non-interlaced mode.

Now, you'll notice that the above line still says 720x480 and applications will still see a 480-line resolution (that is, emulators will want to run at 2x scale). That's because the firmware still acts like normal 720x480 (or 576 lines for PAL) and the composite encoder just displays only half the lines.

This is actually to our benefit because it allows us to easily go back and forth at runtime and has the potential for on-the-fly switching (though RetroArch/Lakka doesn't support that and probably never will). It also allows emulators to show interlaced content without freaking out (that is, a "true" 240p resolution would cut off half of the picture, while this setup will just blank out every other line, which is much less obtrusive).

I have some pics here but, hilariously, the one from the new firmware turned out the worst:
RPi 240p Composite

Analogue Nt - RGB-PPU YPbPr

RPi 480i Composite
If you look closely, you can see that the RPi 240p shot has gaps between each scanline (easier to see on the green waves of the hill than on Luigi), while the 480i shot does not. What the still image can't show is that the 240p image is rock-solid stable, while the 480i image flickers sickeningly. Either way, the RPi composite output obviously does proper NTSC encoding, so blending of dithering and so on happens automatically without needing a shader, which is nice. EDIT: the NTSC encoding is (obviously, in retrospect) using the RPi's full 720 horizontal res timing rather than a console's native timing, so effects that depend on NTSC artifacting may or may not look like you would expect. For example, here's what the "tvpassfail" NTSC test ROM *should* look like:
NTSC Pass/Fail test ROM with maister's NTSC 256 px shader
But this is what the RPi's composite output actually shows:
NTSC Pass/Fail test ROM via RPi composite output
There's still crosstalk, of course, but it's spread across more pixels, which breaks the test. Perhaps unsurprisingly, it looks closer to the 320 px NTSC shader output:
NTSC Pass/Fail test ROM with maister's 320 px shader
With this new firmware, the RPi3 is now arguably the best/easiest/cheapest way to do proper 240p emulation on a typical NTSC standard-def television. Previously, a softmodded Wii was the undisputed champ in this area, as it was the only way to do 240p without putting a series of adapters and converters in the mix. The Wii still has an advantage insofar as it can output a high-quality YPbPr signal (i.e., comparable to the Analogue Nt shot above) but the RPi3 has the ability to emulate more consoles, including great Playstation 1 emulation via PCSX-ReARMed and decent N64 emulation via the core formerly known as GLupeN64 (now renamed to just Mupen64Plus-libretro). The Pi2SCART add-on from ArcadeForge can get a cleaner, "pixel perfect" output from emulators on the RPi, but at ~$50, it costs significantly more than the RPi itself, costs as much as a used Wii and requires adapters to work with standard NTSC televisions. So, in my opinion, RPi is the way to go for cheap/easy "240p" emulation on a regular ol' U.S. TV, while the Wii is a step up in visual quality but more of a hassle (and fewer games/consoles available to emulate). Pi2SCART wins in both respects but also adds significant cost.

Monday, June 13, 2016

Higan Special Chip Images

Higan's bsnes emulator uses low-level emulation (LLE) for the special chips found in some SNES games. Cait Sith's hardware page has dumps of these chips but it can be hard to find the split program/data versions needed for Higan, so here they are.

Wednesday, March 9, 2016

Using Rollback to Hide Latency in Emulators

This is something I thought about a pretty long time ago but recently decided to flowchart out in case anyone wanted to implement it.

The way rollback-based netplay (e.g., GGPO and RetroArch's current netplay implementation) works with emulators is that the two players exchange input states (which are small enough to pass back and forth within the time of a single frame of emulation) and then when they diverge, you roll back to a previous known-good time where the input still agreed and then emulate the intervening frames with the corrected input data to catch up (in RetroArch, these are called 'lag frames').

I had an idea for hiding a frame of latency that would work similar to that concept but in a single-player situation (click to embiggen):

The way it works is whenever the player's input changes, you roll back one frame and apply the new inputs retroactively and then emulate two frames to catch back up. This makes your inputs go into effect one frame before you actually pressed the button(s). This wouldn't result in a rollback loop because, even though we feel like we press a lot of buttons all the time when we play a game, most of the time (particularly from the emulator's point of view) we're really just holding a button or two.

You would want the audio to run one frame behind the video, so your audio buffer wouldn't be constantly emptying and skipping around every time you roll back. Instead, it would fill back up with the next frame's audio during catch-up. Despite running a frame behind the video, our brains would unconsciously sync the audio with the video, as they are very forgiving about that sort of thing (this is a known effect).

One drawback is that you would frequently lose a single frame of animation but thankfully our brains are quite good at papering over that sort of thing, as well. The other drawback to this method is that it would require emulating two full frames in the space of a single frame, so the CPU requirements for any emulator using it would be doubled.

Again, this method would hide a single frame of latency. While most PC setups have significantly more than one frame of latency to contend with, every little bit helps.

UPDATE (4/12/2016): I was talking to letoram, author of ArcanFE, the other day and he mentioned that he had implemented something just like this recently and that the lagging audio made everything seem *more* latent, presumably due to the everything-syncs-to-the-slowest effect mentioned in the above link. I didn't ask him whether muting/disabling audio helped with this or not.

UPDATE (4/30/2018): A few months ago, Dwedit--the author of PocketNES and Goomba Color emulators for GBA--mentioned having a similar idea and after some brief planning and discussion, he whipped up a working model and then refined it into a functional feature for RetroArch. It's included in the 1.7.2 release under the name "runahead". Some differences in his approach to the one I described include keeping audio in sync (rather than lagging behind) and having the option of running a second instance of the core to hop over to in the case of audio issues. To avoid weird rollback effects (see: the 'lose a single frame of animation' thing in my original post), Dwedit astutely recognized that as long as you keep the number of rollback frames below the number of internal lag frames in the game (that is, the number of frames it takes for your input to cause a reaction on the screen), the effect is completely invisible to the user.

Thursday, June 25, 2015

Latency Testing

My student worker, Alex, borrowed a digital oscilloscope and photoresistor from a coworker of mine and we sat down at my workstation to collect some data in an area that's often discussed (vociferously!) but rarely actually tested: latency. Most latency testing is unscientific voodoo ("I can *feel* it") that also suffers from confused terminology (see: the fighting game community's complaints about "lag" and how it makes them drop their combos). In this case, we're specifically examining input latency; that is, the difference in time between pressing a button on the controller and the action taking effect on the screen.

Here's a picture of our test bench, which consisted of a button from my trusty Happ-modded Mad Catz SE wired into the aforementioned oscilloscope:
The input from the button is compared against the voltage running through the photoresistor attached to a battery (and a momentary switch to keep the resistor from just draining the battery):
The photoresistor gets placed against my computer monitor while the button is used to make things happen in the emulators. As the brightness changes underneath the photoresistor, the resistance also changes changes, and the oscilloscope displays the difference in time between the voltage drop in the button and the change in voltage from the resistor/battery circuit, which looks something like this:
We only had the equipment for a day, so I couldn't test as much as I would have liked, but I tried to be as consistent as possible. To that end, we sampled 5 data points for each variable and did all of the testing on the same machine. All SNES comparisons used the Super Famicom Controller Test  ROM, while the arcade comparisons used Espgaluda from Cave (in hindsight, probably not the best choice, but it's what I had on-hand). I also didn't have a good way of getting a baseline latency--I'm using a modern, crappy Dell LCD setup rather than a CRT and Windows 7 64-bit, which I chose out of both convenience and the assumption that it would be similar to a typical user's setup--so I was forced to provide data for *total system latency* rather than being able to isolate the latency caused by the individual variables. In attempting to get some sort of baseline, we held up the tester to the built-in gamepad testing applet in Windows, which gave results hovering around 75 ms, which is obviously not accurate, since some of our emulators performed better than that... With that in mind, these results should only be considered relative and not absolute.

Note: my full system info is Intel i7 Sandy Bridge with AMD R7 200 series with all of the GPU control panel crap turned off except for Eyefinity.

Anyway, here are the graphs that illustrate some of the more interesting comparisons:
First off, Aero compositing is bad news for both latency and variance. The increased variance is a real kick in the pants because it makes your performance less predictable. If you want consistent behavior and generally improved latency, stick with a "classic" non-Aero theme. Interestingly, disabling Aero did not seem to help with Higan.
Overall, this graph shows us that exclusive fullscreen is significantly better than windowed for latency, which is expected based on our Aero compositing findings. You'll notice there's no benefit to fullscreen in Higan (it's worse, in fact) because it's not *exclusive* fullscreen. Instead, it's what's known as "windowed" or "borderless" fullscreen. You can also see that ZSNES in exclusive fullscreen is extremely fast; faster than my supposed baseline of 75 ms :O
Higan had the highest latency figures here, even after correcting for the shaders--which I'll talk about more in a sec--with RetroArch about a frame lower (this includes data from both the snes9x and bsnes-compatible cores, which were not significantly different [87 ms vs 92 ms, which is within the variance of USB polling rates]). This also combines both windowed and fullscreen, which hurt ZSNES and ZMZ, the clear winners in exclusive fullscreen mode from our previous graph. Note: when ZSNES and ZMZ went into exclusive fullscreen, they broke Eyefinity, which other testing suggested adds up to ~8ms (or a half-frame) of latency, so keep that in mind when looking at their results.
This one was a dagger in my heart, but I'm posting it here anyway because of SCIENCE. I had always assumed that shaders would never increase latency because, in a worst-case scenario, they would just reduce the framerate (i.e., if the shader takes >16 ms to render). This is obviously not the case, as cgwg's crt-geom increases latency considerably in both Higan and RetroArch, as does crt-lottes. Crt-hyllian, on the other hand, has almost no effect on latency. To explore whether it's just heavy-duty math that causes the latency and whether it's exacerbated by multiple shader passes, I also tested Hyllian's xBR-lvl4-multipass in RetroArch. Shockingly, this one produced lower latency than no shader at all, which I find highly dubious.
I kept this one in here because there's been a contentious debate as to which of these platforms provides the best experience for emulating arcade games. However, there are some serious caveats to keep in mind before drawing too strong of a conclusion: 1.) this used a different test ROM from the SNES emus, 2.) the test ROM I used was selected out of convenience and actually had a lot of potentially confounding noise in the form of enemy bullets passing through my test area, 3.) GroovyMAME and RetroArch are really at their best running in KMS via Linux rather than Win64, so they would likely have more pronounced benefits vs mainline MAME if I could have measured that, and 4.) in initial testing the day before I ran these measurements, mainline MAME performed incredibly badly, with GroovyMAME close behind, which suggests that there may be some other variance involved.

That all said, these data indicate that RetroArch is approximately 1.5 frames slower than GroovyMAME, while the difference between mainline MAME and GroovyMAME is within the variance of USB polling rates. However, in light of the counfounders, I think the strongest conclusion we can draw reliably from the arcade comparison is that RetroArch isn't any *better* in Win64 (i.e., a null finding), so users should go with whichever platform has the features that best suit their needs rather than worrying about slim-to-nonexistent latency differences.

Conclusions

While the testing was not 100% reliable due to multiple confounders in several areas, we can see some trends emerge that can inform our discussions about latency in emulation. Windowed is definitely worse than fullscreen, and enabling Aero compositing is worse than without while also increasing variance and unpredictability. Shaders can actually cause excess latency, sometimes severely so. ZSNES, which has become a bit of a punching bag among SNES emulation scenesters, has outrageously low latency in fullscreen, so if you can stomach the terrible accuracy, there's actually some justification for using it now other than OMGSNOW!1! Alcaro's ZMZ also performed very well and can utilize more accurate emulation cores, so it can be a means to leverage some of ZSNES' latency benefits without being stuck with its poor accuracy.

In the future, I would like repeat these tests with a CRT monitor, which would have a predictable baseline of near 0 ms. I would also like to test latency in other environments, namely Linux+KMS. Finally, it would be very useful to have some comparative figures for original SNES hardware (both via CRT and upscaled via XRGB-Mini) and for RetroArch running via console.

Here is a link to download the raw data in Excel format, in case anyone would like to look at the numbers in more detail and/or perform other comparisons that I didn't think of.

EDIT: I think some people are drawing more conclusions from these data than is really appropriate; specifically, some folks are trying to draw direct comparison between the emulators/frontends tested. These data are simply not extensive enough for that. Furthermore, it's important to keep in mind that I didn't test the quality of sync, which could heavily affect the results. Namely, ZSNES and ZMZ both suffer from frequent audio crackling and frame stutters, which indicate issues with vsync, while RetroArch has none of either. I didn't test RA with vsync disabled (i.e., blocking on audio with video tearing), which could have an effect, and in general gameplay, users need to decide whether improvements in sync are worth minor (potential) increases in relative latency.

Wednesday, December 31, 2014

N64 3-Point Texture Filtering in mupen64plus-libretro

The Nintendo 64 console used a lot of weird hardware that contributed to its distinct look. For example, N64s used bilinear filtering when scaling some textures, similar to how modern GPUs handle texture resizing, but instead of using 4 sampling points like modern hardware, the N64 only used 3 (current texel, upper-left and bottom-right).

Update (12/29/18): I thought it would be helpful to post some text from Nintendo's patent filing regarding the N64's texture filtering:
Texture filter 532 in this example can perform three types of filter operations: point sampling, box filtering, and bilinear interpolation. Point sampling selects the nearest texel to the screen pixel. In the special case where the screen pixel is always the center of four texels, the box filter can be used. In the case of the typical 3-D, arbitrarily rotated polygon, bilinear filtering is generally the best choice available. For hardware cost reduction, display processor texture filter unit 532 does not implement a true bilinear filter. Instead, it linearly interpolates the three nearest texels to produce the result pixels. This has a natural triangulation bias which is not noticeable in normal texture images but may be noticed in regular pattern images. This artifact can be eliminated by prefiltering the texture image with a wider filter.
This caused textures to have a distinctive, hexagonal "rupee" shape:
Image taken by TrekkiesUnite118 on the Sega-16 forums; see the texture pattern on the wall.
When emulating an N64, if you use modern 4-sample bilinear filtering, those textures don't render properly, which can lead to ugly artifacts, like the jagged texture under these stairs in Kakariko Village:
Way back in 2010, there was a discussion on the devmaster forums about reproducing this 3-point sampling in software with some great screenshots and code samples. Then, a couple of years later, ArthurCarvalho posted an HLSL shader that performed the same function on the Emutalk forums.

Skip to 2014 and my friend aliaspider, author of the awesome GTU shader and the guy responsible for porting RetroArch to the PSP (among many other things), ported this HLSL code to GLSL and plopped it into the rendering code for the libretro fork of mupen64plus, where it is applied on a per-texture basis. This clears up many of the texture artifacts typical of N64 emulation and provides that familiar, pointy-textured look:
To my knowledge, no other N64 emulators have implemented this texture filtering option at the time of this writing. Update (9/15/2015): looks like gonetz has added it to his crowdfunded gliden64 plugin.

Monday, November 3, 2014

Hooking a PC to my Arcade Cabinet

As I mentioned at the end of my previous post, I traded my Super Punch Out!! cabinet for a generic Dynamo cab that I intend to drop a Street Fighter II Turbo: Hyper Fighting board into at some point. In the meantime, I decided to hook up a PC for use with emulators, specifically MAME via the RetroArch frontend.

As with my TVs and Retro Gaming post, this subject ended up being more complex than I anticipated, and the information available online is incomplete and often takes place on forums with poorly hosted pics, etc. So, I thought I'd share my experience here in the hope that others can avoid any potentially costly mistakes.

First off, it's important to realize what an arcade cabinet really is: a low-res tube television in a giant wooden box with some lights and speakers, not unlike one of those old console TVs. The major difference is that arcade monitors use an RGB connection, which--as stated in my TVs and Retro Gaming post--is the cream of the crop for video quality. That stated, if you don't already own a cabinet and you live in PAL land, you could build yourself a big wooden box and drop a SCART-capable CRT into it and have much the same results with a VGA-to-SCART adapter. To do the same thing in NTSC regions, you would need a TV with "component" (aka YPbPr) video inputs and a VGA-to-component adapter. If you decide to go this route, you'll be able to achieve a pixel-perfect arcade picture on your boxed TV using emulation, but you won't be able to connect actual arcade boards. You'll also need to take care that your PC is outputting a 15 khz horizontal sync rate video signal, which can be difficult to achieve with standard PC components (more on this later).

I wanted to be able to connect actual boards, so I went with an actual arcade cabinet, which adheres to the JAMMA video and connector standards. If you decide to go down this path, I strongly recommend going JAMMA-compatible, rather than using some funky custom cabinet (e.g., a Punch Out!! / Play Choice 10 cabinet...), as it will make switching among boards--and your PC--much easier. That was the entire purpose of the JAMMA standards, after all.

The JAMMA connector standard supports 2 players, each with an 8-way joystick (i.e., 4 switches per) and 4 buttons each (a start button and 3 action buttons for each). This is plenty of inputs for most games, but not for the 6-button fighting games that became popular toward the end of the arcade era. The JAMMA standard was extended to accommodate these additional inputs--sometimes known as JAMMA+--but this limitation to the original standard is important to keep in mind.

So, assuming you have a JAMMA/+-compatible cabinet and monitor, you have some other decisions to make. For controls, you have a number of options, including: 1.) dropping in the guts of a pair of USB joysticks, like the Mad Catz TE/SE arcade sticks, which are well-supported on PC, 2.) use the guts of a pre-made PC-to-arcade control panel, like those from X-Arcade, 3.) use a purpose-built control interface board, like Toodles' Cthulhu board or Ultimarc's I-PAC2/4 boards, or 4.) piggyback off the existing control panel connection to your cabinet's JAMMA connector via Ultimarc's J-PAC interface, which is what I chose:

The J-PAC allows you to keep the same controls whether you're on PC or actual arcade board, so you're not having to mess with a bunch of quick-disconnects every time you want to switch between the two. Moreover, the J-PAC is designed to block out incompatible video signals via the red jumpers. On a standard CGA arcade monitor, you'll want to leave only the bottom, 15 khz jumper and remove the other one, which comes defaulting to 31 khz (i.e., VGA standard, and potentially dangerous for some arcade monitors).

While the J-PAC is an excellent piece of kit, they have made a few design decisions that are...strange, to say the least, and you should be aware of them ahead of time. First, and possibly most importantly, J-PAC boards no longer come with a micro-USB port, but it seems none of the marketing shots on the websites of Ultimarc or resellers reflects this. Instead, all you get is some empty solder pads where the port should be:
Instead, they run the USB signal through the left-hand PS/2 port, so you can either connect the board to your PC using a PS/2 Male-to-Male cable, which I certainly don't have on-hand, or use a PS/2-to-USB adapter like this one (note: only "dumb," i.e., non-active, adapters will work):
in conjunction with a USB-A-male-to-USB-A-male cable, which is extremely uncommon and, again, I certainly did not have one on-hand. So, since I had to order something anyway, I went with a PS/2 Male-to-Male cable, since PS/2 is a stream protocol and doesn't have the limitation of USB polling rates.

The other strange choice is on the VGA port. Instead of attaching a VGA female port, as you might expect from monitors and so forth, they have attached a VGA male port, which means you can't use a normal VGA cable and must instead use a VGA extension cable (i.e., with one male end and one female end). This choice is made stranger still by pairing the male VGA port with *female* thumbscrew ports, which means you can't attach a normal extension cable without first removing the thumbscrew ports, which is the only thing holding the VGA port's faceplate to the board! After digging around in your cabinet for your lost faceplate, you can flip the thumbscrew ports around and screw the male ends into your VGA extension cable's female thumbscrew ports, but the on-board port gets in the way of the screws turning and basically makes it a big pain in the ass.

Andy, if you read this: please switch to a female VGA port, or at least fix the thumbscrew/faceplate issue. It's quite frustrating.

Anyway, once that's all done, you'll also need to attach your additional buttons--that is, the 3 kick buttons for each player--to the handy screw terminals on the left-hand side of the J-PAC. Ultimarc has given us 5 additional inputs per player (conveniently labeled 1SW4, 1SW5, etc.), as well as unpowered speaker ports (powered speaker ports would have been nice, of course, but it's a limitation of the JAMMA connector's power draw, apparently) and a couple of grounds. I was pleased to find that I didn't need to actually hook anything up to the provided grounds, as the existing common-ground that was already daisy-chained across my control panel buttons worked just fine. This will reduce the amount of fiddling with disconnects necessary when switching to an actual arcade board from the J-PAC.

As a result of the unpowered speaker ports, you'll need to either cannibalize the amplifier out of some cheap computer speakers and attach your cabinet's speakers to it, or else simply drop some computer speakers, amplifier and all, into your cabinet and call it a day, which is what I decided to do. It doesn't sound awesome, but it's passable.

You'll also have to decide how and where to house your PC components within the cabinet. Arcade cabinets have a substantial amount of empty space inside of them, particularly down around the coin door, but none of it is really easily accessible unless you can remove the entire back of your cabinet. On mine, the back does not remove easily,  other than a small access hatch for servicing the monitor, so I stuck my PC components in there, below the monitor cage, beside the cabinet's own power supply:
As you can see, I also rigged up an extra arcade pushbutton I had lying around to serve as the PC power switch.

Speaking of the cabinet's power supply, Ultimarc's own J-PAC installation instructions recommend completely disconnecting your cabinet's power supply from the JAMMA connector and only leaving it connected to the monitor. This is good advice for very old cabinets/power supplies, which can burn out over time if they don't see a load in the proper places. It was also good advice in case you plugged your J-PAC into the JAMMA connector upside-down, but this evidently isn't a problem anymore due to changes in the circuitry. I've also screenshotted Andy's post about it in case that link dies at some point:
Once you have everything installed and situated, you can power on your cabinet and PC and see how it treats you. As long as your J-PAC only has the 15 khz jumper attached, you can rest assured that your precious monitor will be safe, though it's likely you won't get a picture at this point due to incompatible sync in the signal. Instead, you'll just get a crazy image that looks kinda like trying to watch the scrambled premium channels on old analog cable TV.

If you're absolutely certain you can make the correct, non-damaging signal, you can skip the J-PAC and use a "dumb" VGA-to-arcade-RGB adapter like this one:
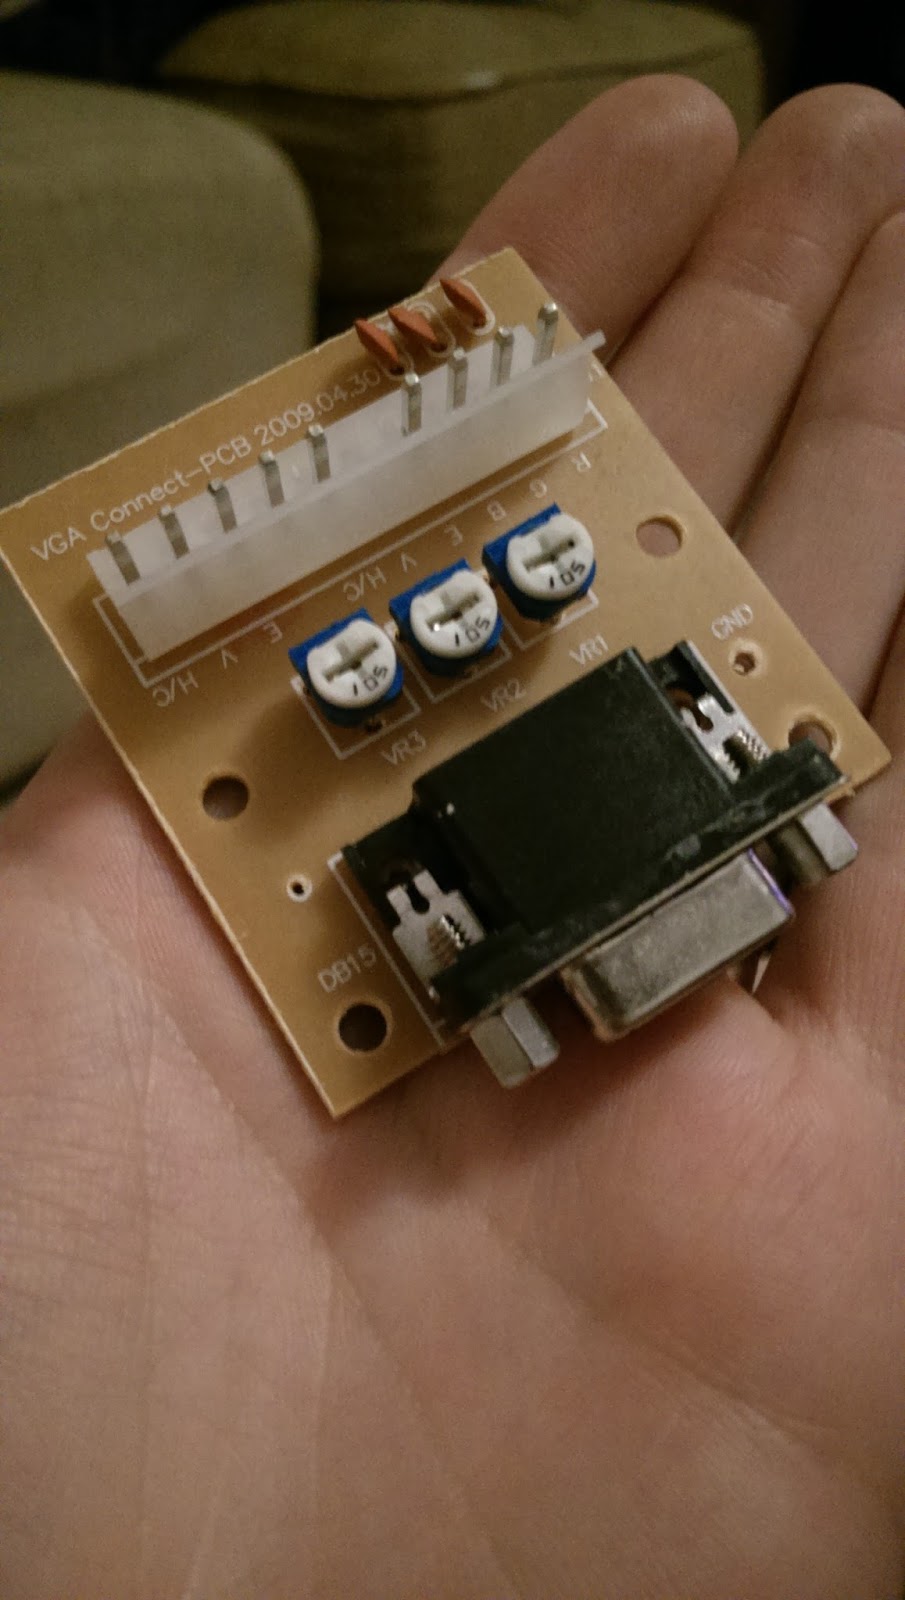
Either way, to get an image to show up, you'll need to use a compatible resolution and sync. On Windows this is achieved through a piece of software known as Soft15khz. In Linux, you can make it happen with the xrandr utility or by adding a custom modeline to your xorg.conf file (which probably doesn't even exist anymore; you'll have to create one from scratch, which is a bit of a hassle). You can also use a custom EDID, which is nice because it works with KMS consoles, but you'll have to recompile your kernel, nvm, you can specify custom EDIDs from GRUB (see this post for details). I went with the xrandr method, and I used a custom resolution of 1920x240. This aspect ratio may seem crazy, but CRTs don't really care what kind of horizontal resolution you feed them, so you can use a super-wide resolution like this and it will make fractional (i.e., non-integer) horizontal resolutions all look fine. 1920 also happens to be exactly 5x the 384 horizontal resolution of CPS-1/2, so Street Fighter games will be perfect. The JAMMA video standard calls for negative composite sync, so any custom modelines you create using modeline calculators (like this one) will need to end with "-HSync -VSync" in order for your monitor to sync up properly.

Once you finally get a picture, it should look something like this:
And that's pretty much it. I purchased an old marquee from eBay for $25 (it has some scratches, but it matches the cabinet's condition, so all the better) and printed out the bezel artwork from some high-res scans I found online. You can buy professionally printed repros for the bezel art, marquees and control panel overlays (CPOs), but they tend to cost as much as old stock for something as relatively new and common as Street Fighter games.

It's also worth noting that it's illegal to actually charge money to play games on a MAME machine, and you have to pay some taxes and be licensed to even accept quarters for any arcade game, so you'll need to hook up an extra button that goes to the coin mech to give yourself credits.

I have some additional woes with my monitor (including a failing flyback transformer, which causes the screen to get blurry, overbright and show horizontal retrace lines toward the top of the screen), which I will cover in another post, as they don't really relate to the subject at hand.

Update (9/15/2015): here are some shots of my repaired monitor playing some games at native res in RetroArch:

Thursday, April 25, 2013

Multipass Shaders - NTSC, Motion Blur and More

It's been a while since I've done one of these posts and, in that time, RetroArch's multipass shader implementation has matured quite a bit, paving the way for a lot of really cool effects that simply can't be done in a single pass. At the time of this writing, higan's multipass shader implementation hasn't been released yet, but many of these shaders should be portable to it (with some substantial effort, at least) when it arrives.

As always, images were captured at 4x scale. Click the thumbnails to embiggen.

First up:
Themaister's NTSC Shader
Themaister wrote a sweet new real-time NTSC Composite shader that mimics a lot of the noise, fringing and crosstalk present in the NTSC composite signal:
This shader is a big deal because blargg's CPU-based NTSC filter was previously the only way to get this effect, which was important in some older games' art design. However, the filter had to be hardcoded to the individual consoles' specific resolution, which made it a headache to maintain in a multi-console setting. This shader should work on all of RetroArch's cores, and it is available in GLSL and Cg/cgp flavors.

I mixed it with cgwg's CRT shader and ended up with this (ntsc2-crt.shader):
You can compare that with an earlier version I cobbled together from the old NTSC shader--which tended to be finicky and not everyone liked anyway--and cgwg's CRT (crt-geom-interlaced-flat-ntsc.shader):
Digging through an old thread on byuu's forum, I also found where cgwg had written a similar shader that combined NTSC with CRT in 6 passes with barrel distortion (6-pass-ntsc+crt2.shader):
In the same thread, cgwg had posted this shader, called 'beam-dynamic,' that is essentially the same result as the beam4 shader mentioned in one of my other posts:
Out of all of these variations, I think my favorite is Themaister's NTSC with the addition of scanlines that have been softened with gaussian blur (ntsc2-maister-scanlines.shader):

Harlequin's Gameboy Shader
This shader does for Gameboy emulators what cgwg's CRT does for regular consoles, i.e., recreates the look of the original display with startling verisimilitude:
I'm not going to spend a lot of time talking about this shader here, even though it's completely badassed, since it's covered at length in a previous post. It's available in Cg/cgp format only, though you can use Themaister's handy cg-to-glsl python script to convert it to GLSL if necessary.

Harlequin's LCD Shader
Using some of the same concepts from the Gameboy shader, Harlequin is also working on a more generalized shader that mimics the low-resolution, slow-refreshing color LCD displays from a number of handheld consoles, such as Sega's Game Gear and Nintendo's Gameboy Advance:

Similarly, cgwg posted an LCD shader he's been working on that produces a regular, square pixel grid pattern, paired with some simple motion blur (lcd-cgwg.shader):


Motion Blur
Speaking of motion blur, I wrote a multipass version of this shader a while back and cgwg revised it down to a single pass (refers to previous frames, so still incompatible with higan v092 and earlier). This effect can be good for mimicking the slow response time of crummy LCDs (motion blur.shader):
I also made a version that only adds the blur during rewind, along with a little sepia-tone effect, kinda like the rewind effect in Braid (braid rewind.shader):
This shader can be added before pretty much any other shader (either manually by pasting in the code or by using the new, built-in RGUI shader stacking function and/or glslp shader configuration files) at a scale of 1.0 and the effect will only kick in when the game is rewinding :D

GTU
This shader from aliaspider is an interesting take on the CRT paradigm insofar as he didn't want to focus on phosphor emulation or heavy-handed scanlines or any of that other jazz. He was more interested in the blurring/blending effect of CRTs that enabled tricks like pseudo-hires transparency and color dithering. Later revisions include some sweet gamma correction and the ability to create mild scanlines (if you choose; GTUv031-multipass.shader):
I think this is one of the best ways to get pseudo-hires transparency working properly, and the transparency it creates is smooth and absolutely beautiful:
Aliaspider made a single-pass version of the shader that should work in higan v092 and earlier, along with the multipass version linked above for RetroArch, and a multipass version for higan v093's upcoming shader implementation.

My 4k Phosphor Shader
This is another one that I won't spend much time on, since I cover it at length in another post:
This shader currently doesn't look so hot as it's designed to work at around 10x scale (i.e., on a 4k resolution television or other high-DPI display; it gets wrecked by subpixel behavior at current normal scales [read: 1080p]). However, it brings some nice things to the table, such as easily-edited LUTs that can be created/modified in Photoshop/GIMP rather than a text editor and scale-ability to freaky-huge resolutions. I'll attempt to convert this to byuu's higan v093 format at some point, though it may take some time.

Thursday, September 13, 2012

Background Shader for RetroArch

UPDATE (9/18/2012): It turns out the Themaister already wrote a waaay better version of this shader that can do some cool things like move the location of the game window and scale to arbitrary scale factors (i.e., not just even integers). I also made another old TV background:
If you'd like to try Themaister's version of the shader--which I've provided as-is, as well as combined with flat and curved CRT shaders--you can download it and the above TV background here:
http://www.mediafire.com/?av2y788pn3v1b3e

UPDATE (9/26/2012): Another one by request, using Super Metroid's Japanese artwork:
Download:


Original Post:

I've been working on a fun little pixel shader for use with RetroArch that functions similarly to the Cg border shader but using GLSL and the XML shader format. The way it works is that it combines the functionality of the existing integer scale shader with a lookup texture (LUT) that loads an external texture and then combines that image with the rendered game image. The LUT then has a transparent window in the middle where you can see the game peeking through.

In the simplest application, you can put whatever fancy stuff you want around the game window, like this awesome pixel-art border created by FirebrandX (NOTE: all of these look better in actual use; the way I took the screenshots caused the game's vertical resolution to get cut off by the border a bit):

By using RetroArch's awesome multipass shader support, you can also tack on some fun effects, like cgwg's CRT shader and some high-resolution artwork:

We can also do fun stuff like this TV border:


And we can use the transparency of the background image to overlay things across the game, like this Super Mario Bros 2 border, which has the characters overlapping a bit:

You can download these and others here:

To use the shader, you'll need to uncheck the 'Lock Aspect Ratio' option in RetroArch, under 'Video' and put the desired background image in the same folder as the shader with filename 'background.png.' The backgrounds only work with specific monitor resolutions, so I've included 1080p versions of the ones pictured above, while FirebrandX was kind enough to make several iterations of his sweet pixel-art backgrounds that work at their specified resolutions. I've also included several background-compatible shaders, including the raw shader, ones with cgwg's CRT+NTSC-RGB (both flat and curved varieties) and some with cgwg's CRT+NTSC-RF (both flat and curved varieties).

In case you'd like to make your own, I've also included a simple template (in PSD format) for 1080p resolutions.

Analytics Tracking Footer